
Watering
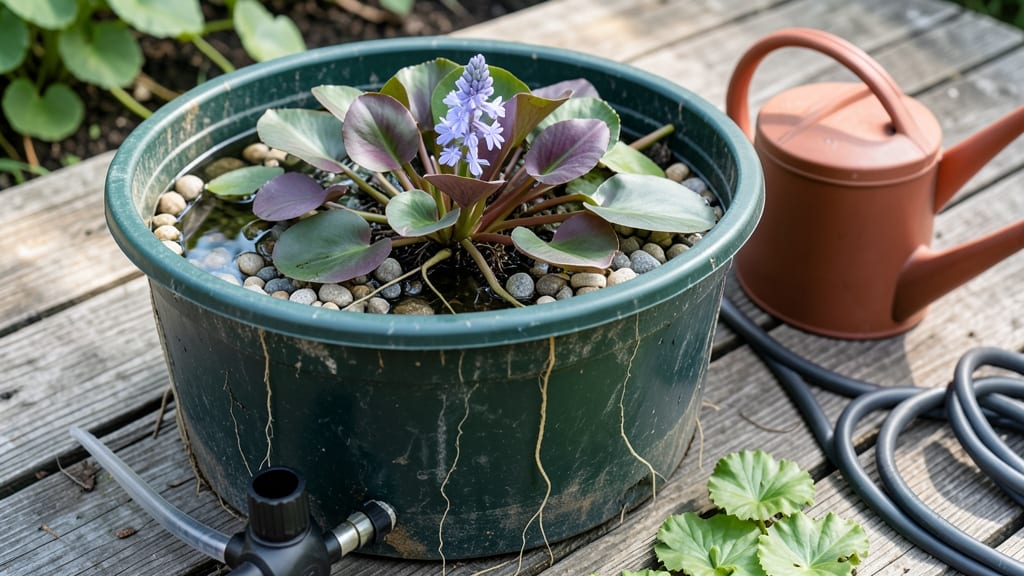
A serene water garden in a container transforms any space into a tranquil retreat—without the headache of digging or drainage. 🌿 I’ve built three of these over the years, and the one that stays crystal-clear with minimal fuss is my favorite: a simple, self-contained system that thrives on sunlight and a handful of low-maintenance plants.
The magic happens with the right container—a sturdy plastic tub, a repurposed livestock tank, or even a preformed pond liner in a decorative basin. You’ll need a small pump (for circulation), a few aquatic plants (like water hyacinth or floating ferns), and a liner or sealant to keep water contained.
No plumbing required—just a garden hose for filling and occasional top-ups.
By the time you’re done, you’ll have a self-sustaining ecosystem that hums with life: dragonflies skimming the surface, lily pads shading the water, and the soothing sound of trickling water—all in a space that fits on a patio or balcony.
The best part? It stays clean with the right plant balance, so you’re not stuck mucking out sludge every week.
Perfect for small yards, urban balconies, or even indoors near a sunny window. Here’s how to pick your container, choose plants that work together, and avoid the rookie mistakes that turn your pond into a swamp. Let’s get started!
📚 In This Guide
- What you need
- Instructions
- Tips and common mistakes
- Wrapping up and next steps
What you need
- ● Container: A large, sturdy pot (15+ gallons), half-barrel, or even a repurposed trough. Ensure it has drainage holes (or plan to add them).
- ● Water: Dechlorinated (use a water conditioner) or rainwater to avoid harming aquatic life.
- ● Substrate: 2–3 inches of gravel or small pebbles for drainage and root support.
- ● Aquatic Plants: Floating plants: Water hyacinth, duckweed, or water lettuce (1–2 plants).
- ● Marginal plants: Water lilies (small variety), pickerel weed, or sweet flag (1–2 plants).
- ● Submerged plants: Hornwort or anacharis (1 bunch) for oxygenation.
- ○ Fish (optional): Hardy species like guppies, goldfish, or rosy red minnows (2–4, depending on container size).
- ● Drill & bits (if modifying your container for drainage).
- ● Waterproof liner (if your container lacks a smooth interior, e.g., for a half-barrel).
- ○ Small pump (optional) for circulation and aeration (1/8–1/4 HP).
- ● Decorative rocks/stones for aesthetics and hiding spots.
- ● Water conditioner (e.g., Seachem Prime) to neutralize chlorine.
- ● Fish-safe algae scraper and net for maintenance.
- ● 🌡️ Place your container in partial shade to prevent algae blooms and keep water cool.
- ● ✨ Start small! A 20-gallon container can support 2–3 small fish and a few plants without overcrowding.
- ● 🔄 Add plants gradually to avoid nutrient imbalances (e.g., too many fish + not enough plants = murky water).
Step-by-Step instructions for creating a container water garden
Here's how to build a self-contained aquatic oasis that thrives without constant maintenance.
🪴 Step 1: Select and Prepare Your Container
Choose a container that's at least 12 inches deep—deeper means more stable water temperature and better oxygen levels for aquatic plants. I like wide, shallow bowls or half-barrels because they provide surface area for plants while keeping water evaporation manageable. Clean the container thoroughly with a 10% bleach solution to kill any existing bacteria, then rinse well and let it dry completely in the sun.
If your container lacks drainage holes, don't worry—this is a closed system. Instead, focus on creating a liner-free design. Place a layer of 1-2 inches of small gravel at the bottom to improve water circulation and prevent root rot. This gravel will also anchor your aquatic plants securely while allowing water to flow freely around their roots.
💧 Step 2: Layer Your Water Garden Foundation
After the gravel base, add a 2-inch layer of aquatic plant substrate—this specialized soil is designed to stay loose and provide nutrients without compacting. I like to mix it with a handful of perlite to improve drainage further. This layer will support your marginal plants (those with roots in water) while keeping the water clear.
For a natural look, place a few flat stones or river rocks around the edges before adding water. These create visual interest and provide surfaces for beneficial algae to grow, which helps keep the water balanced. Avoid rounded pebbles—they don't anchor plants well and can roll when you're planting.
🌿 Step 3: Add Water and Plant Marginal Species
Fill the container with dechlorinated water (leave tap water out for 24 hours or use a dechlorinator) until it reaches about 1 inch below the rim. This leaves room for plants to grow without spilling. I always add water slowly to avoid disturbing the substrate layer I just created.
Start with hardy marginal plants like water hyacinth, pickerel weed, or sweet flag—these thrive in shallow water and add immediate beauty. Plant them at the edges where roots will stay moist but leaves remain above water. You'll know they're planted correctly when the soil line is just below the water's surface, with leaves floating or standing upright.
☀️ Step 4: Introduce Floating Plants and Fish (Optional)
Add floating plants like water lettuce or duckweed to provide shade and prevent algae growth. These plants also create microhabitats for tiny aquatic creatures. Start with just a few—too many will block all sunlight and smother your marginal plants. Watch for first true leaf growth on your marginal plants as a sign they're establishing roots.
If you want to include fish, add them last after the plants have had 2-3 weeks to establish. Start with hardy species like guppies or white cloud mountain minnows—these are small, peaceful, and adapt well to container ecosystems. Never add more than 1 inch of fish per gallon of water to maintain balance in this closed system.
⏰ Step 5: Maintain Balance and Enjoy Your Oasis
Check water levels weekly and top off with dechlorinated water as needed—evaporation is your only water loss in this closed system. I like to use a small hand pump for precision. Remove any yellowing leaves from marginal plants immediately—they'll rot and cloud the water. This is the only regular maintenance needed.
Your container water garden will mature beautifully in 4-6 weeks, with plants filling in and creating a self-sustaining ecosystem. The key to long-term success is patience—don't be tempted to overcrowd with plants or fish. A balanced system requires space for each component to thrive independently while supporting the whole.
Tips & tricks for creating a thriving container water garden
Here's what I've learned after building and maintaining several container water gardens—these tricks will help yours flourish with minimal fuss.
Container Depth Matters: While the instructions call for a container that's at least 12 inches deep, I've found that adding a few extra inches (up to 18 inches) makes a noticeable difference in water temperature stability, especially in hot climates. The deeper water retains cooler temperatures longer, which is crucial for aquatic plants and any fish you might add later. This also allows for better oxygen circulation, which prevents stagnation and keeps your garden healthy.
Substrate Selection Tip: The instructions mention using a 2-inch layer of aquatic plant substrate mixed with perlite. I recommend adding a thin layer of activated carbon to the substrate—just sprinkle about 1/4 cup on top before adding water. This helps filter impurities and keeps the water crystal clear for weeks longer. It's a small investment that makes a big difference in water quality.
Planting Strategy: When planting your marginal plants in Step 3, I've found that slightly burying the plant crowns (where the roots meet the stems) just below the substrate line gives them a stronger start. This prevents them from floating up as they grow, which can happen with some varieties like water hyacinth. It's a small adjustment that makes a big difference in plant stability and growth rate.
Fish Introduction Timing: The instructions suggest waiting 2-3 weeks before adding fish, but I've learned to be even more patient. If possible, wait until you see new leaf growth on your marginal plants and the water has fully cycled (usually 3-4 weeks). This gives your plants time to establish roots and develop a natural filtration system through beneficial bacteria. The extra week of preparation makes all the difference in creating a balanced ecosystem.
Pro Tips for Make A Water Garden In A Container
- Here's what I've learned after building and maintaining several container water gardens—these tricks will help yours flourish with minimal fuss.
- The deeper water retains cooler temperatures longer, which is crucial for aquatic plants and any fish you might add later.
- Substrate Selection Tip: The instructions mention using a 2-inch layer of aquatic plant substrate mixed with perlite.
Frequently asked questions
Got questions about creating your own container water garden?
You’re not alone! Here are answers to the most common queries to help you dive in with confidence.
What’s the best time of year to start a container water garden?
Spring or early summer is ideal—warmer temperatures help plants establish roots faster, and you avoid winter dormancy or extreme heat. However, hardy aquatic plants (like water lilies or cattails) can be planted in late summer or early fall in milder climates. Just ensure your container has drainage holes if winterizing for cold regions!
Can I use any container, or are there specific types that work best?
Most food-grade containers (plastic, fiberglass, or resin) work, but avoid treated wood or metal (which corrodes). Opt for deeper containers (12"+) for submerged plants and wider ones (18"+ diameter) for floating plants. Heavy containers (like half-barrels) stay stable in wind—perfect for breezy spots!
How do I keep my container water garden from smelling bad or getting algae?
Algae thrives in sunlight + stagnant water, so add a small fountain or bubbler ($10–$20) for circulation. Use aquatic plants (like water hyacinths) to absorb excess nutrients. Monthly water changes (20–30%) and barley straw (natural algae inhibitor) help too. Avoid overfeeding fish—stick to 1–2 small koi or goldfish per 50 gallons!
What are the easiest low-maintenance plants for beginners?
Start with these hardy, self-sustaining picks:
- Floating plants: Water hyacinth or duckweed (shade water, block algae).
- Marginal plants: Pickerelweed or sweet flag (thrive in sun/part shade).
- Submerged plants: Anacharis or hornwort (oxygenate water, deter mosquitoes).
Do I need a pump or filter for a small container garden?
Not always! For under 50 gallons, plants and occasional water changes often suffice. Add a small pump ($15–$30) if you want:
- A waterfall or fountain (aesthetic + oxygenation).
- Fish (pumps create surface movement, reducing toxins).
- Prettier ripples (even a solar-powered bubbler helps!).
How do I winterize a container water garden?
In cold climates (<32°F/0°C), drain and store tropical plants. For hardy setups:
- Leave 1–2 inches of water in the container.
- Insulate with bubble wrap or straw around the base.
- Remove fish or use a de-icer to keep a small hole in ice.
- Cut back dead foliage in spring before regrowth.
Wrapping up and next steps
Creating a container water garden is easier than you think—and the rewards are pure serenity! 🌿 With the right materials, a little planning, and a dash of creativity, you’ve got a self-sustaining mini oasis that thrives without the drainage drama.
Whether you’re luring frogs, growing water plants, or just soaking in the zen vibes, your tiny pond is now a low-maintenance dream.
Ready to dive deeper? Start small: Test your setup with a few hardy plants or aquatic critters, then expand as your confidence (and garden!) grows. Happy gardening—your future self (and local wildlife) will thank you! 🐸✨