
Tools
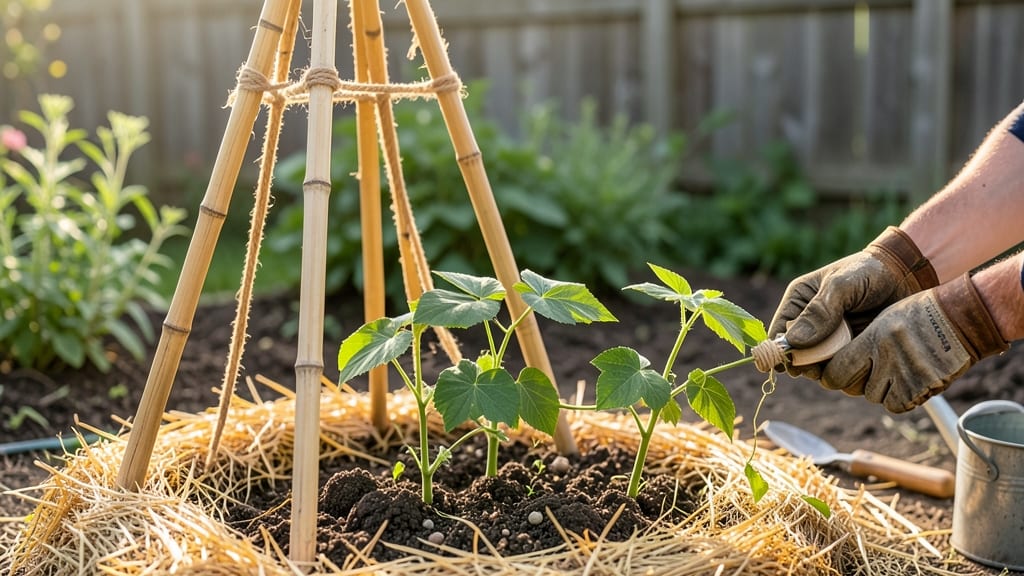
This teepee trellis transforms bare corners into lush vertical gardens. 🌱 I built mine last spring after watching my pole beans sprawl helplessly across the lawn—until I realized how much better they grew when given something to climb.
The right structure turns floppy vines into showstopping features while saving space and keeping plants off the ground. You’ll need 4-6 sturdy poles (bamboo, wooden stakes, or metal rods work best), some twine or zip ties, and 15-20 minutes to assemble. The secret to stability?
Driving poles 12-18 inches deep into moist soil and securing the top with a tight knot or zip tie. For extra support, add a central pole or crisscross the top for larger plants like morning glories.
By summer’s end, your trellis will be bursting with blooms or pods, creating a natural focal point that attracts pollinators. The vertical growth also keeps plants healthier by improving airflow and reducing disease risk. Plus, it’s a game-changer for small spaces—no more sacrificing yard space to sprawling vines.
Works for everything from pole beans and cucumbers to clematis and passionflowers. Try placing one near a seating area for a living backdrop, or line a path with multiple trellises for a whimsical, cottage-garden feel. Here’s how to build yours without wobbles or weak spots!
📚 In This Guide
- What you need
- Instructions
- Tips and common mistakes
- Wrapping up and next steps
What you need
- ● Bamboo poles or wooden stakes: 4–6 poles, each 6–10 feet tall (depending on desired height). Use 1–2 inch diameter for durability.
- ● Garden twine or jute twine: 50–100 feet (for securing poles and tying plants). Opt for 3–5mm thickness for strength.
- ○ Staple gun or heavy-duty zip ties: For anchoring twine to poles (optional but helpful).
- ● Mallet or hammer: To gently drive stakes into the ground (if using wooden stakes).
- ● Measuring tape: For ensuring even spacing (1–2 feet apart at the base).
- ● Gloves: To protect hands from splinters or twine friction.
- ● Metal or plastic trellis connectors: For extra stability if poles wobble.
- ● Waterproof sealant: To treat wooden stakes if used outdoors long-term.
- ● Decorative wraps: Burlap or fabric to camouflage poles for a rustic look.
- ● Plant ties or Velcro plant straps: For easier (and gentler) plant attachment.
Step-by-step instructions for building a teepee trellis
This simple design creates a sturdy climbing frame for pole beans, morning glories, or sweet peas.
🪴 Step 1: Gather and Prepare Your Materials
For a 4-foot diameter teepee, you'll need five 6-foot bamboo stakes (or similar flexible, sturdy poles). I prefer bamboo because it's lightweight yet strong enough to support heavy vines. If using wooden stakes, choose ½-inch diameter ones to prevent splitting. Cut each stake to 6 feet—this gives you 2 feet of height above the ground for planting and 4 feet of climbing space for vines.
Test each stake for flexibility by bending it slightly—it should bend without snapping. If using bamboo, soak the bottom 6 inches in water for 10 minutes to soften the ends before inserting into the ground. This prevents splitting when you push them in. Real talk: don't skimp on stake thickness. Thin stakes will lean or break under the weight of mature vines.
⏰ Step 2: Assemble the Teepee Frame
Drive the first stake 6 inches deep into the ground at the center of your planting area. Use a mallet for bamboo or a post hole digger for wooden stakes. The stake should stand straight and firm—tap it gently to check stability. Now, arrange the remaining four stakes in a circle around it, spacing them evenly about 18 inches apart at the base. Each outer stake should lean slightly inward (about 10-15 degrees) so they naturally form a cone shape when tied together.
Here's the thing—don't force the stakes upright. Let them lean naturally against each other. Push them just deep enough so they stay put when you tie the tops. If they wobble, add a 6-inch wooden stake as a temporary brace on the side facing away from the center. You'll see the teepee take shape as you work—this is where the magic happens.
🌱 Step 3: Secure the Top with Twine or Zip Ties
Tie the top of each outer stake to the center stake using 3-foot lengths of twine or zip ties. Start by tying the center stake to one outer stake at the top, then loop the twine around the next stake, and so on until all five stakes are connected. Pull the twine firm but not tight—you want the structure to stay upright but still allow some flexibility for wind. For extra durability, I double-knot each connection and trim the excess twine.
Adjust the height of each outer stake so the top of the teepee forms a smooth cone. The apex (very top) should be about 4 feet above the ground, giving vines plenty of room to climb. If a stake sags, push it deeper into the ground or add a short wooden dowel as a temporary support until the twine holds it firmly. Don't over-tighten the twine—you'll see the structure settle naturally after a few days.
☀️ Step 4: Reinforce and Plant Your Climbers
After 24 hours, check the teepee for stability. If any stakes lean too far outward, gently push them back inward and re-tie the twine. For added strength, wrap jute twine horizontally around the teepee at 1-foot intervals—this creates additional support for heavy vines like pole beans. Plant your climbers 3-4 inches away from the base of the teepee, so their tendrils can easily reach the stakes without struggling.
I always plant morning glories at the center of the teepee because their vines grow fast and help stabilize the structure early on. For pole beans, space plants 6 inches apart around the base. Water deeply after planting to help roots establish before the vines take over. Watch for the first tendrils to appear within 1-2 weeks—that's your signal the trellis is working!
Tips & tricks for perfect teepee trellis construction
Building a sturdy teepee trellis is all about balance—between flexibility and strength, patience and precision. These insights will help you avoid common pitfalls and create a framework that lasts all season.
Stake Selection Matters: While bamboo is ideal for its natural flexibility, don't overlook alternatives like sturdy wooden dowels or even metal rebar if you're dealing with particularly aggressive climbers like pole beans. The key is finding poles that bend slightly when tested—this flexibility prevents snapping under vine weight. I've seen gardeners use willow branches for a more rustic look, though they'll need more frequent reinforcement as they dry out.
The 10-Minute Soak Secret: That brief soaking of bamboo stakes' bottoms isn't just about preventing splitting—it's about creating a stronger bond with the soil. The softened ends compress more easily when pushed into the ground, creating a tighter seal that resists wind. For wooden stakes, consider pre-drilling small holes at the bottom to improve drainage and prevent rot over time.
Twine Tightness Technique: When securing the top stakes, think "firm but flexible"—the twine should hold the structure upright but allow for slight movement in wind. I've learned the hard way that over-tightening creates stress points where the twine can cut into the wood over time. For extra durability, use UV-resistant twine or zip ties rated for outdoor use, especially if your trellis will be exposed to sun.
24-Hour Stability Check: The instructions mention checking stability after 24 hours, but I recommend doing this twice—once immediately after assembly and again after a rainstorm if possible. This gives you time to make adjustments before vines start climbing. If you notice any outward lean after the first check, gently push stakes back inward and add temporary support with wooden dowels until the structure settles naturally.
Pro Tips for Make A Teepee Trellis
- Building a sturdy teepee trellis is all about balance—between flexibility and strength, patience and precision. These...
- Stake Selection Matters: While bamboo is ideal for its natural flexibility, don't overlook alternatives like sturdy w...
- The 10-Minute Soak Secret: That brief soaking of bamboo stakes' bottoms isn't just about preventing splitting—it's ab...
Frequently asked questions
What’s the best time of year to build a teepee trellis?
A teepee trellis is most useful when your vines are young and flexible—typically early spring (before planting) or late winter (if you’re overwintering plants like kiwi or wisteria). For annuals like pole beans or morning glories, set it up 2–4 weeks before planting to give roots time to establish near the structure.
Can I use a teepee trellis for heavy vines like grapes or kiwi?
While teepee trellises work great for lighter climbers (beans, cucumbers, morning glories), they’re not ideal for heavy vines like grapes or kiwi. These need sturdier supports (e.g., A-frame trellises or cables). If you’re determined, use thicker bamboo (2+ inches) or metal rebar and space poles closer together (12–18 inches apart).
What if my teepee keeps leaning or collapsing?
Leaning or collapsing usually means unstable bases or weak ties. Fix it by:
Weeds compete for nutrients and can weaken your trellis over time. Prevent them by:
With a little care, your trellis can last 3–5 years (or longer for bamboo). After harvest:
How do I keep weeds from growing around the base of the trellis?
Can I reuse a teepee trellis for multiple years?
Pro Tip: Need a portable option? Use bamboo stakes (cheap and lightweight) instead of permanent poles. Just sink them deeper for stability!
Wrapping up and next steps
Building a teepee trellis is a rewarding project that transforms your garden into a thriving vertical oasis!
With just a few materials and some elbow grease, you’ve created a sturdy, eye-catching support for pole beans, morning glories, or even climbing flowers. Pat yourself on the back—you’ve just elevated your gardening game!
Now that your trellis is ready, the next step? Plant, grow, and enjoy! Watch your vines climb, flourish, and add beauty to your outdoor space. Ready for more DIY projects? Try adding decorative touches or even building a mini greenhouse around it. Happy gardening! 🌱✨