
Planting
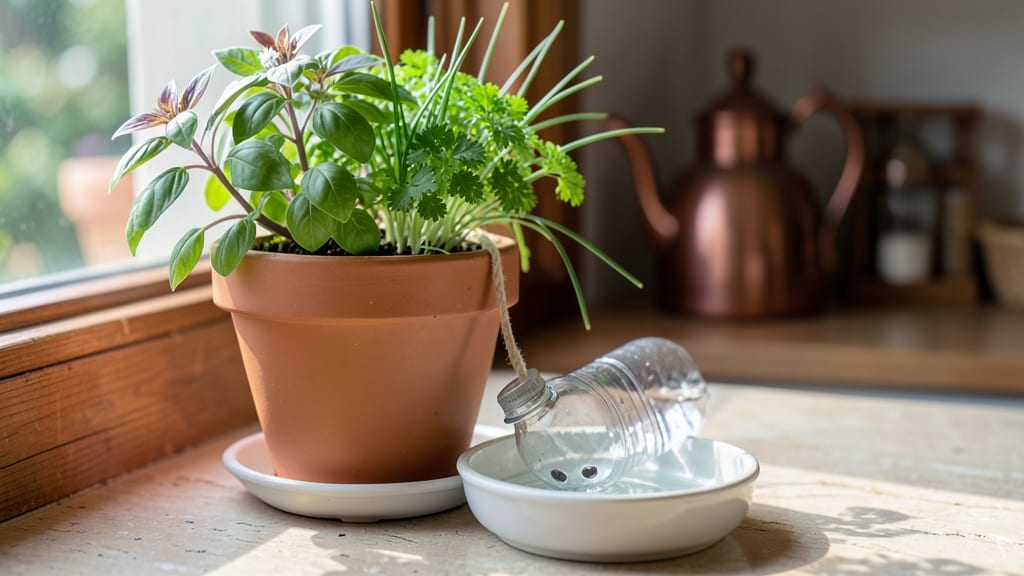
Forget the watering schedule—your plants can finally drink on their own. 🌱 I designed this DIY self-waterer after my ferns kept drying out while I was away, and it’s now the secret weapon in both my indoor jungle and outdoor pots.
The system uses basic materials to create a reservoir that slowly feeds roots exactly what they need, cutting watering by 80% without drowning tender leaves.
You’ll need just three things: a container with a drainage hole, a wick (old cotton rope or felt strips work best), and a water reservoir—nothing fancy. The setup takes 10 minutes, and once assembled, it keeps soil consistently moist for 2-4 weeks, depending on plant type and climate.
Perfect for herbs, succulents, or even veggie starts that hate dry spells.
No more guesswork about whether they’ve had enough to drink. The wick draws water upward as the plant uses it, so roots stay hydrated without soggy soil.
I’ve used this with everything from snake plants (which hate overwatering) to thirsty tomato seedlings, and the results speak for themselves—lush growth with minimal effort.
Works indoors or out, in any container size. The only rule? Avoid plastic wicks—they don’t absorb well. Here’s how to build yours without a single trip to the store for specialty supplies.
📚 In This Guide
- What you need
- Instructions
- Tips and common mistakes
- Wrapping up and next steps
What you need
- ● 1 large plastic bottle (1-2 liters, with a screw cap—clean and food-safe!)
- ● 1 small plastic bottle or cup (50-100 mL, for the wick or reservoir)
- ● 1 long cotton wick (or a strip of fabric like an old T-shirt, ~12-18 inches long)
- ● Scissors (for cutting the wick or bottle)
- ● Drill or sharp knife (to poke holes in the bottle cap)
- ● Water (dechlorinated if possible—let tap water sit 24 hours or use filtered)
- ● 1 small pot with drainage holes (or a larger pot with a DIY liner if needed)
- ● Decorative cover (for a polished look—paint, mosaic tiles, or a cute lid)
- ● Multiple wicks (for larger pots or thirsty plants like succulents)
- ● Water level indicator (add food coloring to the water for visibility)
- ● Gravel or pebbles (to stabilize the bottle and improve aeration)
Step-by-Step instructions for building a DIY plant self-waterer
Here's the foolproof method I use to keep my plants thriving with minimal effort—perfect for busy gardeners.
🪴 Step 1: Gather and Prepare Your Materials
You'll need a clean, empty plastic bottle (1-2 liters works best), a drill with a small bit, a knife, and a potted plant with drainage holes. I always use a bottle with a narrow neck—it fits snugly into most 6-inch pots without toppling. Cut the top third off the bottle, about 3-4 inches down from the cap. This becomes your reservoir while the lower portion will act as the water delivery tube.
Next, poke 2-3 small holes in the cap using your drill bit. These holes are critical—they'll regulate the water flow into the soil. Space them evenly around the cap's circumference. If you don't have a drill, carefully use a heated nail or ice pick to melt small holes instead. Just be patient—rushing here will make your system leaky or uneven.
💧 Step 2: Assemble the Watering System
Place the cut bottle upside-down into the pot, nestling it against the plant's stem but not touching any leaves. The bottle's base should sit just above the soil surface, about 1 inch down. This positioning ensures water will slowly wick into the soil without drowning the roots. Fill the bottle with water through its cap—leave about 1 inch of air space at the top to prevent overflow when you water from above.
Here's the thing—don't use tap water straight from the faucet if it's heavily chlorinated. Let it sit out for 24 hours first, or use filtered water. Chlorine can stress plants over time, even in small amounts. You'll know your system is working when you see the water level gradually decrease over 1-2 weeks, with the soil staying consistently moist but not soggy.
☀️ Step 3: Test and Adjust the Flow Rate
After assembling, give your plant a normal watering from above to settle the soil. Then, observe how quickly the bottle empties over the next 48 hours. The ideal flow should keep the top inch of soil moist for about 5-7 days without creating puddles. If water drains too fast (you see puddles or the bottle empties in under 24 hours), cover the holes in the cap with a small piece of fine mesh or tape them partially closed.
For plants that need less water, like succulents or cacti, reduce the number of holes to just one tiny pinhole. You'll notice the water level drops much slower, which is perfect for drought-tolerant species. The key is watching your plant's response—wilting leaves mean it's thirsty, while yellowing or mushy stems signal overwatering.
⏰ Step 4: Maintain and Refill Your System
Check your self-waterer every 2 weeks to ensure the bottle still has water. Top it off as needed—never let it run completely dry. When refilling, use room-temperature water to avoid shocking the plant's roots. I keep a small watering can nearby and add just enough to reach the 1-inch air gap mark. This simple habit prevents algae growth in the bottle and keeps the water fresh for your plants.
Seasonal adjustments are crucial. In summer, you might need to refill more frequently due to higher evaporation rates. In winter, the system will last longer between refills. Pay attention to your climate—if you're in a dry region, consider adding a second bottle to larger pots for extra capacity. The goal is consistency, not perfection.
Tips & tricks for perfect DIY plant self-waterers
Took me a while to figure these out, so here's how to avoid common pitfalls and get the most out of your system.
Bottle Selection Matters: A 1-2 liter plastic bottle with a narrow neck is ideal because it fits snugly into most 6-inch pots without toppling. Avoid wide-mouth bottles—they won't nestle properly and may create gaps where water can spill. I've also found that bottles with thicker plastic walls (like soda bottles) hold up better over time, especially if you're using them for thirsty plants like ferns or herbs. The thickness prevents the plastic from becoming brittle and cracking as it ages.
Precision Hole Placement: When making those 2-3 small holes in the cap, aim for consistency in size and spacing. I use a drill bit that's just slightly larger than a toothpick to create uniform holes—this ensures even water distribution. For extra control, place a piece of masking tape over the cap first, mark your hole locations, then drill through the tape. This prevents uneven holes that could cause water to gush out in one spot. If you're working with a heated nail, hold it steady and count to three before removing it to avoid melting the plastic unevenly.
Water Quality is Non-Negotiable: The 24-hour rule for letting tap water sit before using it is critical, especially if you live in an area with high chlorine levels. I've seen plants struggle when given chlorinated water directly—leaves turn yellow and growth slows. For maximum results, use rainwater or distilled water if possible. If you're in a hurry, you can also use a water filter pitcher to remove chlorine quickly. The goal is to mimic the natural water your plants would get in the wild, free from chemicals that stress their roots.
Seasonal Flow Adjustments: The 5-7 day moisture window mentioned in Step 3 is a great starting point, but don't be afraid to adjust based on your climate. In summer, I often add an extra hole to increase flow for sun-loving plants like tomatoes or peppers. In winter, I might reduce to just one hole for most houseplants. Watch your plant's leaves—they'll tell you if you've got the flow right. A happy plant has firm leaves that stay vibrant, while overwatering shows as yellowing or drooping.
Pro Tips for Make A Plant Self Waterer
- Took me a while to figure these out, so here's how to avoid common pitfalls and get the most out of your system.
- Bottle Selection Matters: A 1-2 liter plastic bottle with a narrow neck is ideal because it fits snugly into most 6-i...
- Precision Hole Placement: When making those 2-3 small holes in the cap, aim for consistency in size and spacing. I us...
Frequently asked questions
Got questions?
Here are answers to the most common ones about DIY plant self-waterers to keep your green babies happy without the fuss!
How often should I refill the water reservoir?
It depends on your plant’s thirst and climate! Most self-waterers last 1–4 weeks between refills. Monitor soil moisture—if the top inch feels dry, check the reservoir. In hot, dry weather, you may need to top it up every 5–7 days. Overwatering is rare, but never leave it empty.
Will this work for all plants, or are some better suited?
Self-waterers are great for succulents, herbs, and tropical plants (like pothos or ferns), but avoid plants that hate wet feet, like cacti or orchids. For heavy drinkers (e.g., monsteras), use a larger reservoir. Test first with one pot to see how your plant responds!
What if my DIY setup leaks or stops working?
Leaks usually mean the wick or tube isn’t submerged enough—adjust so the entire wick stays in water. If flow stops, check for clogs (rinse the tube) or air bubbles (tap the container gently). For stubborn issues, try a second wick or switch to a bottle-style waterer (easier to troubleshoot).
Can I use this in freezing temperatures?
Most DIY setups aren’t frost-proof. If temps drop below 32°F (0°C), move potted plants indoors or insulate the reservoir with foam. For outdoor gardens, opt for commercial self-watering systems designed for cold climates—or drain the reservoir before winter.
What’s a cheap alternative if I don’t want to DIY?
No problem! Grab a $5–$10 plastic bottle waterer (poke holes in the cap), a terracotta pot saucer (place the plant inside), or a glazed pot with a built-in reservoir. Even a mason jar with a wick works in a pinch—just keep it simple!
Wrapping up and next steps
Creating a DIY plant self-waterer is a simple, cost-effective way to keep your greens thriving—no matter where life takes you! 🌱 With just a few household items, you’ve unlocked low-maintenance hydration that works for both indoor herbs and outdoor perennials.
The best part? You’ve saved money and reduced water waste while giving your plants the consistent care they deserve.
Ready to level up your plant parenting? Start small: Test your self-waterer with one plant first, then expand to your entire garden. Your future self (and your plants!) will thank you. 🌿✨