
Propagation
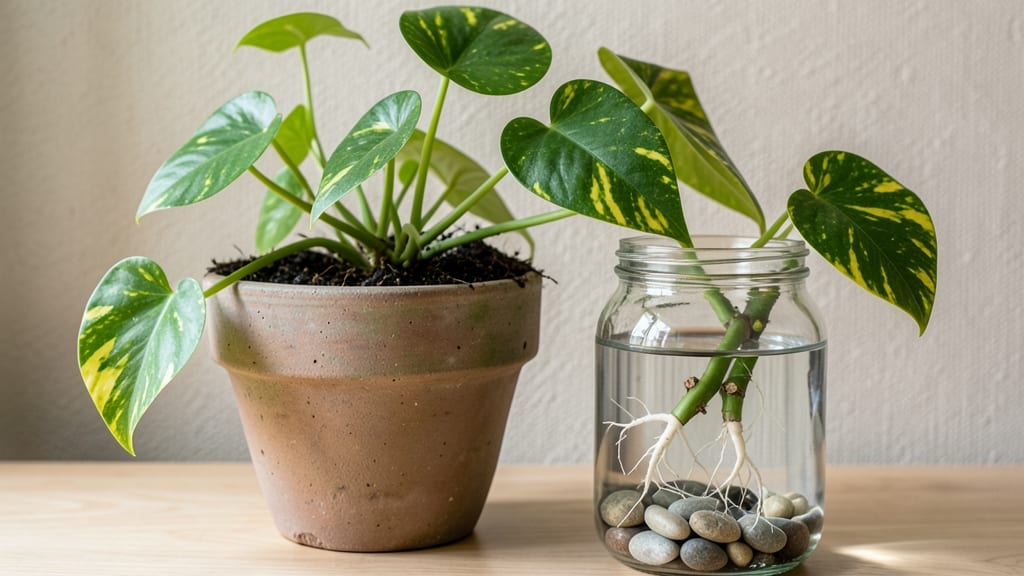
Watch how to grow plants from cuttings in water like magic in a glass of water. 🌱 I've propagated dozens of plants this way—pothos, mint, even coleus—and it's the fastest way to multiply your favorite greens without spending a dime.
The secret? Clear containers let you track progress, and most plants root within 2-4 weeks with just a few simple steps.
You only need three things: healthy cuttings (4-6 inches long), clean water, and a jar or vase. Skip the fancy tools—any clear container works, from a mason jar to a repurposed soda bottle.
Change the water every 3-5 days to prevent bacteria, and place your cuttings in bright, indirect light. That's it.
What you'll end up with is a thriving mother plant and new babies ready to pot up. The roots grow visibly, so you know exactly when they're ready to transplant.
Plus, it's a great way to teach kids about plant growth—they'll love watching those tiny white roots stretch like tiny fishing lines.
Even if your first few cuttings fail (mold or stagnant water), you'll learn fast. The key is consistency—keep the water fresh, avoid direct sunlight, and don't overcrowd the jar. Once you master this, you'll never buy plants again.
📚 In This Guide
- What you need
- Instructions
- Tips and common mistakes
- Wrapping up and next steps
What you need
- ● Healthy plant cuttings: 4–6 inches long (with at least 2–3 leaf nodes per cutting). Choose non-flowering stems for best results.
- ● Clear glass or plastic container: A jar, vase, or even a repurposed bottle (6–12 oz size). Clear containers let you monitor root growth!
- ● Room-temperature water: Filtered or tap water (let it sit out for 24 hours if using tap water to reduce chlorine).
- ● Pruning shears or sharp scissors: Sterilized to avoid disease. Clean cuts = faster rooting!
- ○ Rooting hormone (optional but helpful): A powder or gel to speed up root development (e.g., Clonex or Dyna-Gro).
- ● Peat pellets or sphagnum moss: For transitioning cuttings to soil later.
- ● Small stones or marbles: To weigh down cuttings and keep them submerged.
- ● Plant labels: To track which cuttings are which!
- ● Grow lights or sunny windowsill: Bright, indirect light (6+ hours/day) boosts rooting.
- ○ Hydrogen peroxide (1 tsp per cup of water): Optional disinfectant to prevent bacterial growth.
Step-by-Step instructions for growing plants from cuttings in water
Here's how to coax roots from cuttings in just a few weeks using clear containers.
🌱 Step 1: Select and Prepare Healthy Cuttings
Choose healthy stems with at least 3-4 leaf nodes—these are the spots where roots will form. Use clean, sharp scissors to make a 45-degree angle cut just below a node. This increases surface area for better root growth. Remove any lower leaves that would sit underwater, but leave the top leaves intact for photosynthesis.
I always dip the cut end in rooting hormone powder (optional but helpful for faster results). Tap off the excess so it doesn't cloud the water. The cutting is ready when the end looks fresh and moist—not dried out or mushy. If your plant has thick stems like coleus or mint, you can make a small slit along the bottom to encourage more root growth.
💧 Step 2: Place Cuttings in Clear Water Containers
Fill a clear glass or jar with room-temperature water, leaving enough space at the top to prevent spills when you add the cutting. I like using mason jars because they let me monitor root progress easily. Place the cut end of the stem into the water, making sure at least 1-2 leaf nodes are submerged—this is where roots will emerge.
Change the water every 3-4 days to prevent bacterial growth and keep it fresh. You'll know it's time when the water looks cloudy or develops a film on top. Avoid using tap water that's been sitting out overnight—it can contain chlorine or other chemicals that inhibit root growth. If your water is particularly hard, use filtered or rainwater instead.
☀️ Step 3: Provide Bright, Indirect Light
Set your cuttings in a spot with bright, indirect light—think east-facing window or a few feet from a south-facing one. Direct sunlight can overheat the water and stress the cutting, while too little light slows root development. You'll see the first signs of roots in about 1-2 weeks, but some plants like pothos or snake plants may take up to 3 weeks.
Rotate the container a quarter turn daily so all sides of the cutting get equal light exposure. This prevents the stem from growing crooked toward the light. Watch for tiny white or yellow bumps along the submerged nodes—these are the first root hairs forming. Once roots reach about 1-2 inches long, your cutting is ready for transplanting.
⏰ Step 4: Transplant When Roots Are Established
When roots are 1-2 inches long with multiple branching roots, it's time to move your cutting to soil. Gently remove the cutting from the water and give the roots a quick rinse to remove any chlorine buildup. Fill a small pot with well-draining potting mix and make a hole slightly larger than the root ball.
Plant the cutting at the same depth it was in water, then water thoroughly to settle the soil. Place the pot in a shaded area for 3-5 days to help it adjust before introducing it to brighter light. I like to cover the pot with a plastic bag for the first few days to maintain humidity—just remove it daily for 10 minutes to prevent mold. Keep the soil consistently moist but not soggy during this transition period.
Tips & tricks for fast root growth in water
Want to turn your plant cuttings into thriving new plants in record time? These little tricks will help you skip the guesswork and get those roots growing faster than you'd expect.
Node Selection is Everything: In Step 1, when choosing stems, focus on those with 3-4 leaf nodes—these are your root factories. I've found that stems with more nodes (like 5-6) can actually root faster, though they may take up a bit more space in your container. The key is making that clean 45-degree cut just below a node—this exposes more cells to water and oxygen, which is where the magic happens.
Rooting Hormone Hack: While rooting hormone powder is optional, I've seen it cut rooting time in half for some plants. If you use it, give the cut end a quick shake to remove excess powder—this prevents cloudy water that can inhibit growth. For stubborn plants like oleander or bougainvillea, I double-dip the cut end for extra insurance. Just remember, even without hormone, patience pays off—some plants just need that little extra time.
Water Refresh Rhythm: The 3-4 day water change schedule in Step 2 is perfect, but here's the secret: if you notice tiny white root hairs forming before day 3, you can safely wait another day or two. These root hairs are nature's way of telling you the water's still good. However, if you see algae forming or the water smells funky, change it immediately—even if it's only been 2 days. Fresh, room-temperature water is non-negotiable for happy roots.
Light Positioning Pro Tip: For Step 3's bright, indirect light, I've had the most success placing my cuttings on a bookshelf about 2 feet from an east-facing window. This gives them gentle morning light without the harsh afternoon sun. If you're using artificial grow lights, keep them about 6 inches above the water—closer than that can overheat the water and stress your cuttings. Watch for those tiny white bumps along the submerged nodes—they're your first sign of success!
Pro Tips for Grow Plants From Cuttings In Water
- Want to turn your plant cuttings into thriving new plants in record time?
- Node Selection is Everything: In Step 1, when choosing stems, focus on those with 3-4 leaf nodes—these are your root factories.
- Rooting Hormone Hack: While rooting hormone powder is optional, I've seen it cut rooting time in half for some plants.
Frequently asked questions
Got questions about growing plants from cuttings in water?
You’re not alone! Here are answers to the most common queries to help you propagate like a pro.
What types of plants can I grow from cuttings in water?
Not all plants thrive in water cuttings—stick to easy propagators like pothos, mint, coleus, or snake plants. Avoid woody plants (e.g., roses, fruit trees) or those prone to rot (e.g., succulents). Check if your plant has nodes (bumps on stems) for best results!
How long does it take for roots to grow in water?
Roots usually appear in 2–4 weeks, depending on the plant and conditions. Keep cuttings in bright, indirect light and change the water every 3–5 days to prevent bacteria. Patience pays off—some stubborn cuttings (like herbs) may take up to 6 weeks!
Should I use tap water, distilled water, or something else?
Tap water works, but chlorine can hinder root growth. Let it sit out for 24 hours or use filtered/distilled water for faster results. Avoid bottled spring water (often too mineral-heavy). Pro tip: Add a pinch of cinnamon (natural antifungal) to the water!
What if my cutting turns yellow or smells bad?
Yellowing leaves or foul odors signal rot or bacteria. Trim mushy stems, rinse roots in hydrogen peroxide (3%), and switch to fresh water. If the cutting is beyond saving, start fresh—some plants (like herbs) root faster than others!
Can I plant the water-grown cutting directly into soil?
Yes! Once roots reach 1–2 inches, transplant gently into well-draining soil. Avoid disturbing new roots—pat the soil lightly and water lightly for the first week. Harden off the plant by placing it in indirect sunlight for a few days before full sun.
Wrapping up and next steps
Growing plants from cuttings in water is a rewarding and beginner-friendly way to expand your garden—no soil required! 🌱 With just a few simple steps, you can watch roots sprout in as little as a few weeks, giving you healthy starter plants for free.
Whether you’re reviving a wilted herb or propagating a favorite houseplant, this method is a game-changer for plant lovers.
Now that you’re equipped with the know-how, try it today—start with a single cutting and turn it into a thriving plant! Once your roots are strong, you can transplant them into soil for even more growth. Happy propagating! 🌿✨