
Container Gardens
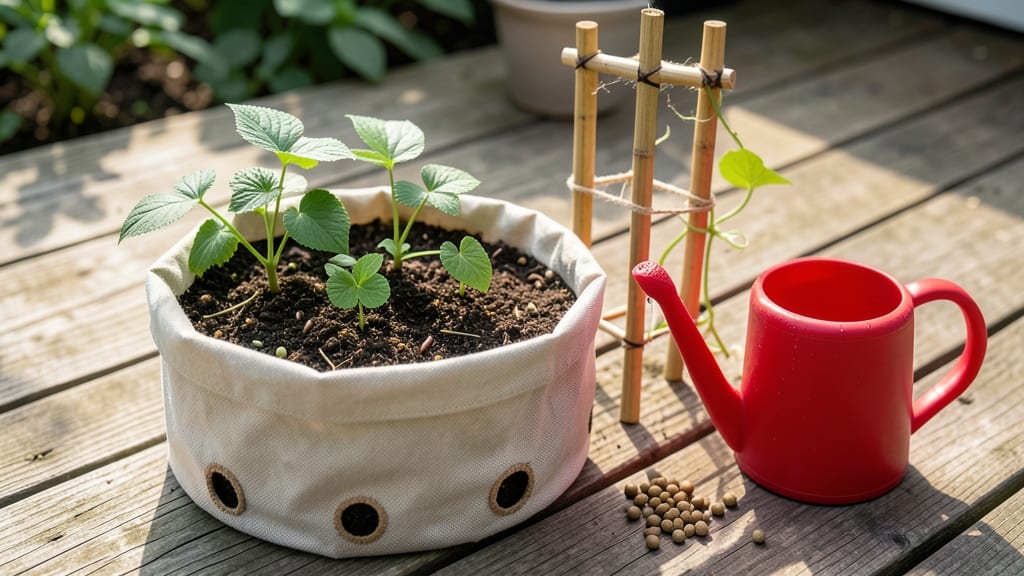
How to grow black-eyed peas in containers means fresh, homegrown legumes even on a tiny balcony. 🌱 I tried this last summer and harvested enough for meals all season—no yard needed. The key is choosing the right container and giving them room to climb or sprawl.
You’ll need at least a 5-gallon container per plant (bigger is better for bush varieties), well-draining soil, and a sunny spot with 6-8 hours of light daily. Black-eyed peas thrive in heat but need consistent moisture—water when the top inch of soil feels dry.
A trellis or sturdy stakes help vining types reach their full potential.
By midseason, you’ll see plump pods forming, ready to pick when firm but before they turn brown. The plants fix nitrogen in the soil, so they improve the growing mix over time. Plus, they’re drought-tolerant once established, making them perfect for container life.
Common mistakes? Overcrowding (space plants 4-6 inches apart) or letting soil dry out completely. With the right setup, you’ll have a steady harvest—no fancy equipment or green thumb required. Let’s get those seeds started!
📚 In This Guide
- What you need
- Instructions
- Tips and common mistakes
- Wrapping up and next steps
What you need
- ● Container: At least 5-gallon size (or larger) with drainage holes. Minimum 12" deep for root growth. Options: fabric grow bags, plastic pots, or wooden barrels.
- ● Potting Mix: Well-draining, organic mix (avoid garden soil). 10-15 lbs per container (adjust for size). Look for blends labeled "container gardening" or "vegetable mix."
- ● Black-Eyed Pea Seeds: 3-5 seeds per container (or 1 seed per 3" of container width). Choose heirloom varieties like "Purple Hull" or "Crowder" for best results.
- ● Fertilizer: Balanced organic fertilizer (e.g., 10-10-10) or compost. 1 tbsp per container at planting, plus monthly feedings with liquid fertilizer (e.g., fish emulsion).
- ● Watering Can or Hose: With a gentle spray nozzle to avoid disturbing soil.
- ○ Trellis or Cage (Optional but Helpful): 5-6 ft tall to support vining varieties. Bamboo stakes or wire cages work well.
- ● Garden Gloves – Protect your hands from thorns (some varieties have them!).
- ● Trowel or Small Shovel – For planting and soil adjustments.
- ● Mulch (Straw or Shredded Leaves) – 1-2 inches to retain moisture and suppress weeds.
- ● pH Test Kit – Aim for 6.0-7.0 pH (black-eyed peas prefer slightly acidic to neutral soil).
- ● Pruning Shears – For trimming dead leaves or vines later in the season.
- ○ Sunlight Meter (Optional) – Ensures your container gets 6-8 hours of direct sun daily.
Step-by-step instructions for growing black eyed peas in containers
Here's how to grow these nitrogen-fixing legumes in limited space with minimal fuss.
🌱 Step 1: Prepare Containers and Soil for Fast Germination
Choose containers at least 12 inches deep with drainage holes—black eyed peas need room for roots to establish before vining. I recommend 5-gallon fabric grow bags or sturdy plastic pots since they hold moisture well without becoming waterlogged. Fill each with a mix of 50% potting soil and 50% compost to give roots the organic matter they crave.
Black eyed peas thrive in slightly acidic to neutral soil with a pH between 6.0-7.0. If your soil runs alkaline, work in a handful of peat moss per container. Press the soil down lightly but don't compact it—these seeds need good air circulation to prevent rot. Moisten the mix until it feels like a wrung-out sponge, then let it sit for 24 hours to settle before planting.
🌱 Step 2: Plant Seeds at Proper Depth for Reliable Sprouting
Sow seeds 1 inch deep, spacing them 2-3 inches apart in rows that are 6 inches apart. Planting too shallow risks drying out the seeds before germination, while burying them deeper delays sprouting. I like to use a small dibble or pencil to make holes—this ensures consistent depth without disturbing the soil structure.
Black eyed peas germinate best in warm soil, ideally between 65-85°F. If your spring nights are still chilly, cover the containers with a clear plastic dome or row cover to trap heat. Water gently after planting to settle the soil around seeds, but avoid soaking—excess moisture encourages fungal diseases that can rot seeds before they sprout.
☀️ Step 3: Provide Support and Optimal Light Conditions
As soon as seedlings reach 3-4 inches tall (about 10-14 days after planting), install a 4-5 foot tall trellis or tomato cage in each container. Black eyed peas are vigorous climbers that will twine around any support. I use bamboo stakes for smaller varieties since they're lightweight and sturdy enough for the vines.
Place containers in a spot receiving full sun (6-8 hours daily). Morning sun with afternoon shade works in hot climates, but direct afternoon sun can scorch leaves. You'll know your plants are getting enough light when the leaves stay a vibrant green and new growth appears every 7-10 days. If growth slows, supplement with a grow light for 12-14 hours daily.
💧 Step 4: Water and Fertilize for Continuous Production
Keep soil consistently moist but never soggy—black eyed peas hate "wet feet." Water when the top 1-2 inches of soil feel dry to the touch, which typically means every 2-3 days in warm weather. I water deeply in the morning to prevent fungal issues, aiming for 1 gallon per container each time. Drip irrigation works best to keep foliage dry.
Fertilize lightly with a balanced 10-10-10 formula when flowers first appear, using half the recommended strength. Black eyed peas fix nitrogen in the soil, so over-fertilizing leads to excessive leafy growth at the expense of pods. Watch for yellowing leaves—this often signals overwatering or too much nitrogen. Reduce watering slightly if you notice this.
✂️ Step 5: Harvest and Encourage More Production
Begin harvesting when pods are 3-4 inches long and firm to the touch—this usually occurs 60-70 days after planting. Pick regularly to encourage more flowers and pods. I harvest every 2-3 days during peak production by snapping pods at the stem with a quick twist. This prevents the plant from putting energy into over-maturing pods.
After the first harvest wave, trim back any leggy vines by one-third to promote bushier growth. Deadhead spent flowers by pinching them off at the base—this redirects the plant's energy into producing new blooms. With proper care, you'll get two harvest cycles per season, with some varieties producing pods until the first frost.
Tips & tricks for growing black eyed peas in containers
Here's what nobody tells you about growing these hardy legumes in limited space—tricks that'll make all the difference between struggling seedlings and a bountiful harvest.
Soil Prep Secret: The 24-hour settling period before planting is non-negotiable. This lets the soil structure stabilize and prevents seed rot from over-compaction. I like to add a handful of perlite to my 50/50 potting soil/compost mix—it improves drainage while maintaining moisture retention. The goal is that "wrung-out sponge" consistency, but with better aeration for those delicate roots.
Germination Temperature Control: Black eyed peas are finicky about soil warmth. If your spring nights dip below 65°F, create a microclimate by placing containers on a heat mat set to low (around 70°F). You can also bury a black plastic bag filled with warm water near the containers—it'll radiate heat without overdoing it. This mimics their native tropical conditions and speeds up germination by 3-5 days.
Lighting Strategy: The 6-8 hours of full sun requirement is non-negotiable, but don't panic if your space gets less. Supplement with a full-spectrum LED grow light positioned 6-12 inches above the plants for 12-14 hours daily. I've had success with a simple 20-watt bulb on a timer—just rotate containers every few days to prevent leggy growth. The key is maintaining that vibrant green color between harvests.
Harvest Hack: When pods reach 3-4 inches, harvest every 2-3 days during peak production to encourage continuous flowering. Here's the pro move: Pick in the morning when pods are crispest. Store harvested pods in a paper bag in the fridge for up to 5 days—they'll stay fresher longer than plastic. And if you notice some pods starting to yellow or dry out, harvest those too—they're still edible and the plant will reward you with more blooms.
Pro Tips for Grow Black Eyed Peas In Containers
- Here's what nobody tells you about growing these hardy legumes in limited space—tricks that'll make all the difference between struggling seedlings and a bountiful harvest.
- Soil Prep Secret: The 24-hour settling period before planting is non-negotiable.
- Germination Temperature Control: Black eyed peas are finicky about soil warmth.
Frequently asked questions
Got questions about growing black-eyed peas in containers? You’re not alone! Here are some of the most common concerns—plus quick, practical answers to help you succeed.
Can black-eyed peas grow in small containers like 5-gallon buckets?
Black-eyed peas thrive in containers as small as 5 gallons, but aim for at least 10–15 gallons per plant for better airflow and root growth. Use deep pots (12+ inches) to support their vining habit. Just ensure drainage holes are present to prevent soggy roots.
How long does it take for black-eyed peas to mature in containers?
With warm soil (60–85°F) and consistent care, black-eyed peas typically mature in 70–90 days from seed. If you’re growing them as a summer crop, start seeds indoors 4–6 weeks before the last frost or direct-sow after soil warms. Patience pays off—harvest pods when they’re firm but still tender!
What if my black-eyed peas aren’t flowering or producing pods?
Lack of flowers or pods often signals heat stress, poor pollination, or nutrient deficiencies. Ensure your plants get 6+ hours of sunlight daily and hand-pollinate by gently shaking stems on warm, sunny days. Boost fertility with a balanced fertilizer (10-10-10) or compost tea every 3–4 weeks.
Can I grow black-eyed peas indoors near a sunny window?
While possible, black-eyed peas need more light and space than a typical windowsill can provide. If you’re set on indoor growth, use a south-facing window + grow lights (12–14 hours/day) and a 5-gallon+ container. Expect slower growth and smaller yields compared to outdoor conditions.
Are black-eyed peas prone to pests in containers?
Yes, but container gardening makes pest control easier! Watch for aphids, spider mites, and Mexican bean beetles. Combat them with neem oil, insecticidal soap, or companion planting (basil/marigolds). Elevate containers to deter slugs and snails, and remove affected leaves promptly to prevent spread.
Can I regrow black-eyed peas from store-bought dried beans?
Yes! Soak dried beans 8–12 hours to soften the seed coat, then plant them 1 inch deep in moist soil. Germination takes 7–14 days—patience is key. Store-bought beans are non-hybrid, so you’ll get true-to-type plants (though yields may vary slightly from heirloom seeds).
Wrapping up and next steps
Growing black-eyed peas in containers is a rewarding way to enjoy fresh, homegrown goodness—even in small spaces! With the right soil, sunlight, and care, you’ll soon be harvesting nutrient-packed pods perfect for soups, salads, or snacks. 🌱
Ready to dive in? Start by prepping your containers and sowing your seeds—your garden (and taste buds) will thank you! For extra inspiration, explore other container-friendly veggies to maximize your harvest.