
Pests and Diseases
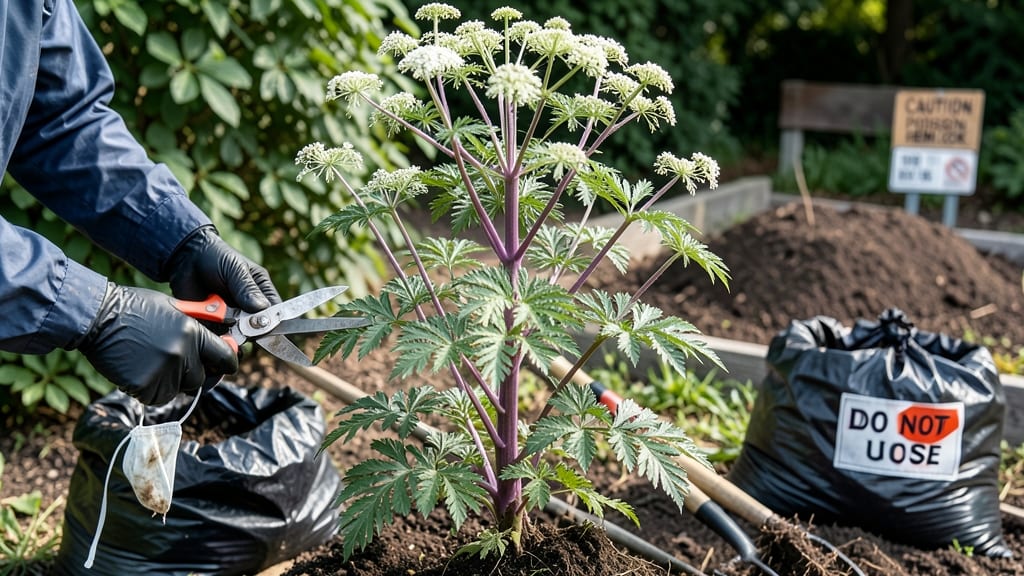
How to dispose of poison hemlock is critical—this plant, which resembles Queen Anne’s lace, contains deadly toxins that can kill pets or children with just one taste. Removal isn’t optional; it’s urgent. I’ve pulled this invasive plant from my garden twice, and I’ll never take it lightly again.
First, never dig barehanded—wear thick gloves, long sleeves, and a mask to avoid skin contact or inhalation. The roots are deep, so you’ll need a shovel with a long handle and a heavy-duty trash bag for disposal. No composting—this plant is too dangerous, even in decomposed form.
Dig 6–12 inches deep to remove the entire root system, then double-bag the plant and roots. Seal tightly and check local regulations—some areas require hazardous waste disposal. A 5-gallon bucket of soapy water can help neutralize any lingering toxins before cleanup.
After removal, wash tools and skin thoroughly with soap and water. If you’re unsure about identification or have large infestations, call a professional—some counties offer free toxic plant removal services. This isn’t a job for guesswork.
📚 In This Guide
- What you need
- Instructions
- Tips and common mistakes
- Wrapping up and next steps
What you need
- ● Heavy-duty gloves – Nitrile or rubber gloves (18+ mil thickness) to prevent skin contact with sap or roots.
- ● Long-sleeved shirt and pants – Made of thick, tightly woven fabric (e.g., canvas or polyester) to cover skin fully.
- ● Closed-toe boots or shoes – Waterproof, with ankle support to protect against root punctures.
- ● Safety goggles – ANSI-rated to shield eyes from sap or debris.
- ● Respirator mask (N95 or better) – For dusty or dry conditions to avoid inhaling plant particles.
- ● First-aid kit – Include activated charcoal (for ingestion), antiseptic wipes, and burn gel.
- ● Shovel or mattock – For digging roots (16"+ blade recommended).
- ● Pruning shears or loppers – Heavy-duty, 8"+ blades for cutting stems (avoid hand pruners!).
- ● Garden fork or root saw – For stubborn root systems.
- ● Heavy-duty trash bags (55+ gallon) – Thick, leak-proof (2-mil plastic) for disposal.
- ● Wheelbarrow or tarp – For transporting cut plants.
- ○ Biodegradable plant killer (optional but helpful) – Glyphosate-based (e.g., Roundup) or vinegar/salt mix (for small patches).
- ● Compost bin with lid (for non-toxic yard waste) – Only if local regulations permit.
- ● Local hazardous waste facility info – Call ahead to confirm poison hemlock acceptance.
- ● Confirm poison hemlock identification with a local extension office or app (e.g., PlantNet).
- ● Check local regulations—some areas require permits for invasive species removal.
- ● Schedule removal on a cool, overcast day to reduce sap exposure.
Step-by-Step instructions for safely removing poison hemlock
This is where careful technique prevents dangerous regrowth or contamination.
Identify and Assess the Plant Correctly
Poison hemlock (Conium maculatum) has purple-spotted stems, fern-like leaves, and grows 3-10 feet tall. Confusing it with wild carrot or parsley is deadly—never dig up anything without 100% identification. Snap a clear photo of the stem base and compare with EPA-approved guides before proceeding.
Check for multiple stems or seed heads. A single plant can produce 50,000 seeds per stalk, so incomplete removal means rapid regrowth. If you see white seed clusters or purple blotches on stems, you're dealing with mature plants that require immediate containment.
Gather Proper Safety Equipment
You'll need thick rubber gloves, long sleeves/pants, safety goggles, and a heavy-duty trash bag. Avoid wearing loose clothing—fiber snags on stems can transfer sap to skin or clothing. I recommend N95 respirator masks if digging near dense patches, as crushed stems release toxic compounds into the air.
Lay out a tarpaulin or plastic sheet where you'll work. This catches falling debris and prevents accidental spread of seeds or sap. Keep a garden hose with a spray nozzle nearby—you'll need it for immediate cleanup of any contaminated soil or tools.
Cut Stems at Ground Level and Bag Immediately
Use loppers or pruning shears to sever stems 1-2 inches below soil level. Never pull—this breaks roots and leaves fragments that regrow. Cutting cleanly prevents underground buds from sprouting new plants. Place each severed stem directly into the trash bag without touching other materials.
For large patches, work in small sections to avoid overwhelming the bag. If stems exceed 3 feet, cut them into 2-foot segments before bagging. Seal each section tightly with twist ties to prevent seed dispersal. Never compost hemlock—organic matter accelerates seed germination.
Remove and Dispose of Roots
Dig around the base with a shovel or trowel, working 6-8 inches deep to capture all root fragments. Hemlock roots are white and fibrous—even small pieces can regrow. Place roots in the same bag as stems, ensuring no soil clings to them. Rinse tools immediately with soapy water to remove any residual sap.
If you encounter rhizomes (thick, horizontal roots), cut them into 1-inch pieces and bag separately. These are the most persistent regrowth source. For stubborn patches, repeat the digging process 2-3 weeks later to catch any missed roots that may have sprouted new shoots.
Clean and Monitor the Area
Hose down the entire work area with water for 30 seconds to remove any lingering sap or seeds. Scrub tools with bleach solution (1 part bleach to 10 parts water) and rinse thoroughly. Dispose of all contaminated materials in sealed trash bags labeled "Poisonous Plant Waste."
Monitor the site for new growth for at least 6 months. Hemlock seeds can remain viable in soil for 5+ years, so vigilance is critical. If you spot any regrowth, repeat the removal process immediately. For persistent infestations, consider professional herbicide application with glyphosate-based products labeled for invasive weeds.
Tips & tricks for safe poison hemlock removal
Handling poison hemlock requires precision—one wrong move can lead to dangerous regrowth or contamination. Here's how to avoid common pitfalls and ensure complete eradication.
Identification is Non-Negotiable: The 100% identification rule in Step 1 isn't just caution—it's safety. I've seen gardeners mistake poison hemlock for wild carrot until it was too late. Use a magnifying glass to check for the distinctive purple blotches on stems and the fern-like leaflets. The base of the stem is your best clue: poison hemlock stems have a hollow center, unlike its lookalikes. When in doubt, take a photo and consult the EPA's plant identification database before touching anything.
Safety Equipment is Your Shield: Those thick rubber gloves and long sleeves in Step 2 aren't just recommendations—they're essential. I learned this the hard way when a glove tore during removal, exposing my arm to the sap. The sap contains toxins that can cause skin irritation and, in some cases, more serious reactions. For dense patches, the N95 respirator mask becomes critical because crushed stems release toxic compounds into the air. Lay out that tarpaulin immediately—it's not just for cleanup but also to create a containment zone that prevents accidental spread.
Root Removal is Where Most Fail: The 6-8 inch deep digging in Step 4 is where most people cut corners. I've seen gardeners dig only 2-3 inches, leaving behind root fragments that sprout new plants within weeks. Pay special attention to rhizomes—those thick, horizontal roots can extend several feet from the main plant. Cut them into 1-inch pieces and bag separately. For stubborn patches, schedule that follow-up removal 2-3 weeks later. It's tedious, but it's the only way to guarantee you've gotten every last piece.
Cleanup Prevents Future Problems: The 30-second hose down in Step 5 isn't just about tidiness—it's about eliminating any lingering seeds or sap that could contaminate your garden. I've seen gardeners skip this step, only to find new hemlock sprouts appearing months later. Use that bleach solution (1 part bleach to 10 parts water) on your tools—it's the only way to fully neutralize any residual toxins. Label those trash bags clearly as "Poisonous Plant Waste" to ensure proper disposal through hazardous waste channels if required by local regulations.
Pro Tips for Dispose Of Poison Hemlock
- Handling poison hemlock requires precision—one wrong move can lead to dangerous regrowth or contamination.
- Identification is Non-Negotiable: The 100% identification rule in Step 1 isn't just caution—it's safety.
- Safety Equipment is Your Shield: Those thick rubber gloves and long sleeves in Step 2 aren't just recommendations—they're essential.
Frequently asked questions
Got questions about safely handling poison hemlock?
Here are answers to the most common concerns—so you can act with confidence and protect your property.
Can I burn poison hemlock on-site?
No, burning poison hemlock is not recommended—even if it’s dead. The smoke contains toxic compounds that can harm your lungs and contaminate the air. Instead, use EPA-approved disposal methods like burial (deep, away from water sources) or professional removal services.
Is it safe to compost poison hemlock?
Absolutely not. Poison hemlock’s toxins persist even after decomposition, risking contamination of soil and nearby plants. If you’re composting, remove all plant parts (roots included) and dispose of them via landfill or professional hazardous waste services.
How long does it take for poison hemlock to decompose in a landfill?
In a landfill, poison hemlock typically breaks down within 1–3 years, but decomposition depends on conditions like moisture and temperature. For faster results, chop plants into smaller pieces before disposal (with gloves and protective gear).
What’s the best time of year to remove poison hemlock?
The ideal time is late summer to early fall (August–October), when plants are mature but seeds haven’t fully dispersed. This minimizes regrowth. Avoid spring, when new shoots may emerge quickly after cutting.
What should I do if I accidentally touch poison hemlock?
Wash your skin with soap and water immediately to remove sap. If irritation occurs, rinse with vinegar (diluted 1:1 with water) to neutralize toxins. Seek medical help if you experience dizziness, nausea, or skin burns—especially for children or pets.
Pro Tip: Double-check your ID!
Poison hemlock resembles wild carrot (Queen Anne’s lace) but lacks a purple stem. If unsure, snap the stem—poison hemlock has a musty, foul odor. When in doubt, consult a local extension office or hire a certified pest control expert.
Wrapping up and next steps
Disposing of poison hemlock safely is all about protection, precision, and proper protocols—whether you’re wearing gloves, using EPA-approved methods, or contacting local authorities. Remember, this plant is highly toxic, so never cut, burn, or compost it without caution. Your vigilance keeps your family, pets, and ecosystem secure! 🌱✅
Now that you’re armed with the right knowledge, take action: inspect your property for any lingering signs of poison hemlock and act fast if you spot it. Stay safe, stay informed, and enjoy a toxin-free space! 🚀