
Pests
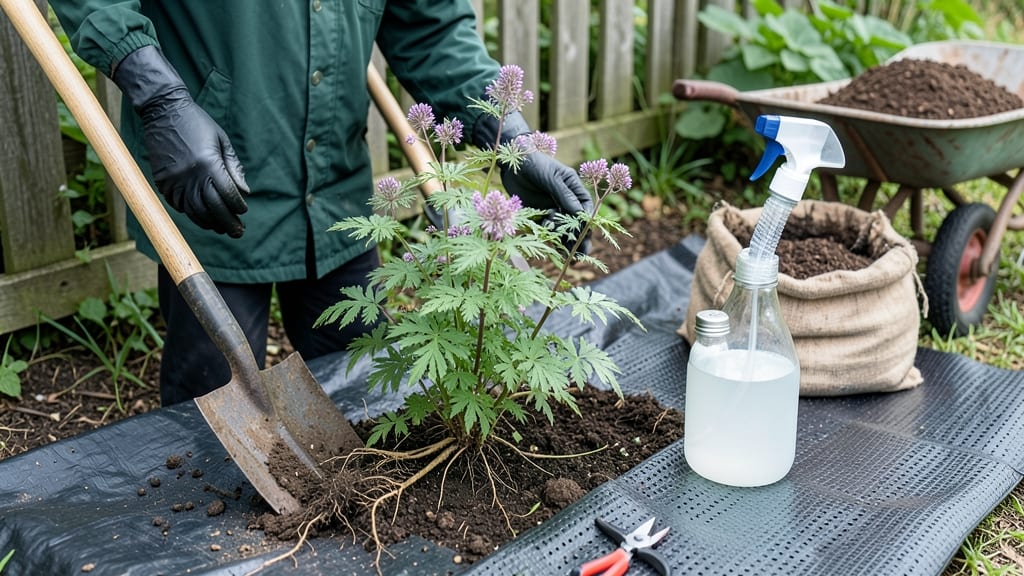
How to get rid of poison hemlock naturally—without harsh chemicals—starts with recognizing its deceptive resemblance to Queen Anne’s lace, a plant that hides deadly toxins beneath its delicate appearance. 🌿 I’ve wrestled with this invasive biennial in my garden—once it takes root, it spreads fast, crowding out everything else. The good news? A vinegar-and-salt spray kills it without harsh chemicals, and manual removal works too if you’re careful (gloves!). This isn’t just about pulling weeds—it’s about starving the roots and preventing regrowth. The vinegar disrupts cell membranes, while salt dehydrates the plant. For stubborn patches, repeat applications over 2-3 weeks until yellowing signals success. Just avoid spraying desirable plants nearby. By late summer, your garden will reclaim space, and next year’s hemlock seedlings won’t stand a chance. The key is persistence: check for new sprouts in spring and act fast. Your garden’s health depends on it—no shortcuts here. For large infestations or dense root systems, consider professional help. But for most backyard battles, this method works—safely, naturally, and effectively—without harming your soil’s long-term fertility.
Root Causes of Poison Hemlock Spread
Poison hemlock (Conium maculatum) isn’t just an unwelcome guest in your garden—it’s a highly invasive biennial weed with deep roots and a knack for spreading like wildfire. Understanding why it thrives in your yard is the first step to stopping it naturally.
Below, we break down the key reasons this toxic plant takes over, backed by science and actionable insights.
Poison hemlock loves specific environmental conditions, which is why it pops up in certain areas more than others. If your yard matches its preferences, it’s basically sending out an open invitation:
- 💧 Moist, Well-Drained Soil
- Hemlock thrives in rich, moist soil but hates waterlogging. It prefers areas with consistent moisture, like garden beds, ditches, and riverbanks.
- Why? Its deep taproot (up to 3 feet!) can access water deep underground, while its shallow lateral roots spread aggressively in the topsoil.
- Actionable fix: Improve drainage in problem areas by amending soil with compost or sand to discourage hemlock growth.
- ☀️ Full Sun to Partial Shade
- While it tolerates shade, hemlock grows fastest in full sun (6+ hours of direct light daily).
- Why? Sunlight fuels its rapid growth—it can reach 8–10 feet tall in a single season if unchecked.
- Actionable fix: Thin dense plantings or mulch heavily in sunny spots to block light and starve out seedlings.
- 🌿 Disturbed or Fertile Soil
- Hemlock exploits disturbed soil, such as:
- Recently tilled garden beds
- Construction sites
- Areas where other plants have been removed
- Why? It’s a pioneer species, meaning it fills gaps left by other plants or human activity.
- Actionable fix: Avoid over-tilling and use living mulches (like clover) to prevent bare soil exposure.
- Hemlock exploits disturbed soil, such as:
Poison hemlock doesn’t just grow—it hitchhikes on human behavior. Here’s how we accidentally help it spread:
- 🚜 Contaminated Soil or Mulch
- Hemlock seeds can linger in garden soil, potting mix, or mulch for years, waiting for the right conditions to sprout.
- Why? Seeds are tiny (1–2mm) and lightweight, easily carried by wind, water, or tools.
- Actionable fix: Sterilize soil with solarization (covering with clear plastic for 4–6 weeks) or use heat-treated mulch.
- 🌿 Unintended Plant Transplants
- Gardeners often accidentally dig up hemlock and replant it, thinking it’s a harmless wildflower (e.g., Queen Anne’s lace, which it closely resembles).
- Why? Its purple-spotted stems (a key ID feature) are often hidden underground.
- Actionable fix: Double-check plants before transplanting—hemlock’s leaves are fern-like and lacy, unlike most edible herbs.
- 💦 Water Runoff from Infested Areas
- Rain or irrigation water can carry seeds from roadside ditches or fields into your yard.
- Why? Hemlock seeds float and can travel miles via water.
- Actionable fix: Install swales or berms to redirect water away from garden edges.
Sometimes, poison hemlock takes over because other plants or predators aren’t keeping it in check. Here’s how nature (or the lack of it) plays a role:
- 🐞 Lack of Natural Herbivores
- While deer and rabbits avoid hemlock (it’s toxic to livestock and humans), some insects do feed on it, like the parsnip webworm. But these aren’t enough to control large infestations.
- Why? Hemlock’s high levels of coniine alkaloids deter most grazers, giving it a competitive edge.
- Actionable fix: Encourage beneficial insects (like ladybugs) by planting native wildflowers to create a balanced ecosystem.
- 🌿 Outcompeted Native Plants
- Hemlock shades out slower-growing native plants, creating monocultures where it dominates.
- Why? Its rapid growth rate (up to 3 inches per day!) lets it outpace competitors.
- Actionable fix: Plant fast-growing ground covers (e.g., creeping thyme) to smother hemlock seedlings before they take hold.
- 🌱 No Competitive Mulch Layer
- Bare soil gives hemlock unobstructed access to sunlight and nutrients.
- Why? Mulch suppresses weeds by blocking light and reducing soil erosion.
- Actionable fix: Apply a 3–4 inch layer of wood chips or straw to prevent seeds from germinating.
Key Takeaway: Poison hemlock spreads because it exploits gaps in your garden’s defenses—whether that’s disturbed soil, lack of competition, or human oversight. The good news? You can flip the script by addressing these root causes naturally. Next, we’ll cover how to disrupt its lifecycle without harsh chemicals.
Natural Ways to Eliminate Poison Hemlock
Poison hemlock (Conium maculatum) is a toxic weed that thrives in gardens, fields, and disturbed soils, but you can tackle it safely without harsh chemicals. Below are practical, garden-friendly solutions tailored to the root causes of its spread—plus prevention tips to keep it from returning.
Best for: Small patches or isolated plants in early growth stages.
How to do it:
- 👨🍳 Wear protective gear – Gloves, long sleeves, and goggles are a must. Poison hemlock’s sap can irritate skin, and its seeds are toxic if ingested.
- 🔪 Cut at the base – Use pruners or a sharp shovel to sever the stem below ground level (at least 2–3 inches deep). This prevents regrowth from the root crown.
- 🗑️ Dispose properly – Seal the plant in a trash bag and do not compost it. If possible, check local regulations for safe disposal methods (some areas require burning or landfill drop-off).
- ⏰ Repeat weekly – Young plants are easier to remove. Check the area for new sprouts every 7–10 days for at least 3 months.
⚠️ Warning: Never pull by hand—roots break easily, leaving fragments that sprout into new plants.
Best for: Established plants in lawns, driveways, or non-organic garden beds.
How to make it:
- 🍯 1 gallon white vinegar (5% acetic acid)
- 🧂 1 cup table salt (or kosher salt)
- 💧 1 tbsp dish soap (as a surfactant to help absorption)
How to apply:
- 🌞 Choose a sunny day – Spray in direct sunlight (vinegar works best when plants are actively photosynthesizing).
- 💦 Spray thoroughly – Coat the entire plant, including the undersides of leaves and stems. Use a pump sprayer for even coverage.
- 🌱 Wait 24–48 hours – The plant will wilt and turn brown. Reapply if any green remains.
- 🔄 Remove debris – Once dead, pull or dig up the plant and dispose of it (as above).
💡 Pro Tip: Test a small area first—vinegar can damage nearby plants if oversprayed. Avoid using this on edible gardens or near desirable plants.
Best for: Large infestations in garden beds, flower areas, or under trees.
How to do it:
- 📏 Cover the area – Lay down cardboard, thick layers of newspaper, or black plastic sheeting over the hemlock patch. Secure edges with rocks or soil.
- 🌱 Add mulch – Top with 4–6 inches of organic mulch (straw, wood chips, or leaves) to block sunlight.
- 💧 Keep moist – Water regularly to prevent the mulch from drying out. Hemlock needs sunlight to grow—deprive it, and it’ll die within 4–8 weeks.
- 🔄 Monitor and repeat – Check for new sprouts. If any escape, smother them immediately.
✨ Bonus: This method also suppresses weeds and improves soil health over time.
Best for: Persistent roots or heavily infested soil.
How to do it:
- 🔨 Dig deep – Use a shovel or dandelion digger to remove all roots, including the taproot. Aim for 6–12 inches deep to avoid missing fragments.
- 🌞 Solarize the soil (optional but effective):
- After removal, water the area thoroughly.
- Cover with clear plastic sheeting (secured tightly).
- Leave for 4–6 weeks in hot sun (100°F+). This kills remaining seeds and roots.
- 🌱 Replant – Once the area is clear, add compost or organic matter to restore soil health before planting new species.
💡 Pro Tip: Solarization works best in summer months when soil temperatures are highest.
Best for: Preventing future growth in large areas (e.g., fields, meadows).
While poison hemlock has no natural predators in North America, livestock grazing (in controlled settings) can reduce its spread:
- 🐑 Sheep and goats may eat it (though it’s toxic, some animals tolerate small amounts).
- 🐖 Cattle usually avoid it due to its bitter taste.
- ⚠️ Warning: Never graze in areas where hemlock is dominant—consult a veterinarian first.
🌱 Alternative: Plant competitive ground covers like clover or creeping thyme to outcompete hemlock for space.
Once you’ve eliminated poison hemlock, stop it from returning with these strategies:
- 🌱 Fill in bare soil – Hemlock thrives in disturbed or compacted areas. Plant dense ground covers or cover crops (like winter rye) to block sunlight.
- 💧 Improve drainage – Hemlock loves moist, low-lying areas.
Amend soil with compost or sand to encourage healthier, competitive plants. 3. 🌿 Inspect seed sources – Hemlock spreads via seeds and root fragments. Check hay, mulch, and wildflower mixes for contamination before purchasing. 4. 🚫 Avoid tilling – Tilling spreads root pieces and seeds.
Use hand-pulling or smothering instead. 5. 📅 Stay vigilant – Check your garden weekly in spring and fall (peak germination times) for new sprouts.
**Final
Frequently asked questions
Can I use vinegar alone to kill poison hemlock?
While vinegar works, adding 1 cup salt and 1 tablespoon dish soap makes it more effective. Plain vinegar may require multiple applications, but the salt dehydrates the plant faster while the soap helps the solution stick to leaves. Always test on a small area first—vinegar can damage nearby plants.
How do I know if I’ve removed all the roots?
Check for purple-spotted stems or new growth after 2-3 weeks. If you see any sprouts, dig deeper—hemlock roots can extend up to 3 feet. For stubborn patches, solarize the soil afterward by covering with clear plastic for 4-6 weeks to kill remaining seeds.
Is it safe to compost poison hemlock?
Never compost it! The toxic alkaloids in hemlock can persist in soil and harm other plants. Seal the plant in a trash bag and dispose of it in the landfill or burn it (if local regulations allow). Even small root fragments can regrow into new toxic plants.
Why does hemlock keep coming back after treatment?
Hemlock spreads via seeds and root fragments. If you missed any pieces, they’ll resprout. Check for new growth weekly in spring and use a mulch layer (3-4 inches) to block sunlight from germinating seeds. For large areas, smothering with cardboard + mulch works best.
Can I use this method in my vegetable garden?
Yes, but with caution. The vinegar solution should only target hemlock—overspray can harm edible plants. For gardens, manual removal or smothering with mulch is safer. Always wear gloves and dispose of plants properly to avoid contaminating your soil.