
Tools
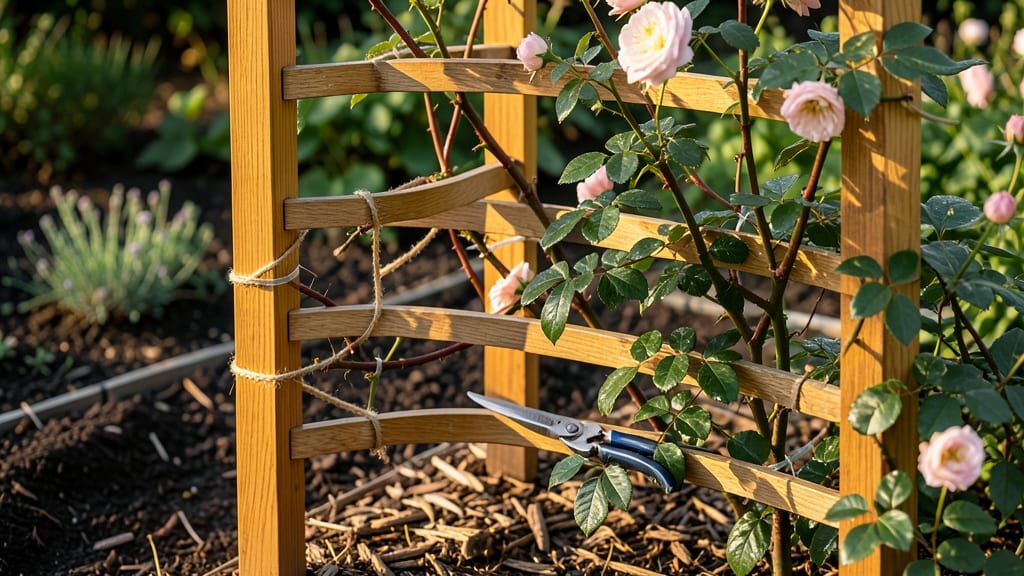
Building a climbing rose trellis transforms bare walls into a fragrant, blooming masterpiece—and it’s easier than you think. 🌹 I’ve constructed three different designs over the years, and the simple wooden arbor remains my favorite for its balance of strength and elegance.
The key lies in the right materials and a few smart structural choices that prevent wobbling while supporting roses that can weigh 50+ pounds when laden with blooms.
You’ll need 4x4 posts, 2x4 beams, and either lattice panels or thick wire mesh for climbing support—nothing fancy, just sturdy. My first attempt used flimsy wire that sagged under the weight; now I reinforce connections with galvanized screws and metal brackets for long-term durability.
The design can be as simple as a 5-foot-tall obelisk or as grand as a 10-foot archway, depending on your space and the rose varieties you’re growing.
Once built, your trellis becomes the backbone of your garden’s vertical beauty. Imagine velvety petals cascading down in summer, their scent lingering in the evening air, while the structure itself blends seamlessly into your landscape.
Roses climb with thorny determination, so the trellis must hold firm—no more flimsy DIY disasters. With the right build, you’ll have a decades-long centerpiece that only gets more stunning with age.
Whether you’re framing a sunny patio corner or adding height to a shady garden bed, this project adapts effortlessly. The best part? You’ll spend under $100 on materials and end up with a trellis that outlasts cheap store-bought options by years.
Let’s get those roses reaching for the sky—properly supported, of course.
📚 In This Guide
- What you need
- Instructions
- Tips and common mistakes
- Wrapping up and next steps
What you need
- ● 4x4 pressure-treated lumber – 2 pieces, 8 feet long (for vertical posts)
- ● 2x4 lumber – 4 pieces, 8 feet long (for horizontal supports)
- ● Galvanized or coated metal screws – 2.5-inch wood screws (100+) (rust-resistant!)
- ● Concrete mix – 1 bag (60 lbs) (for anchoring posts)
- ● Trellis netting or lattice panels – 1-2 panels (4x8 ft) (for climbing support)
- ○ Post caps or decorative tops – 2 pieces (optional but stylish!)
- ● Measuring tape
- ● Circular saw or miter saw
- ● Drill/driver with screwdriver bits
- ● Level (to keep everything straight!)
- ● Shovel (for digging post holes)
- ● Wheelbarrow (for mixing concrete)
- ● Safety gear (gloves, goggles)
- ● Stain or paint (for weatherproofing)
- ● Landscape fabric (to prevent weeds)
- ● Decorative brackets or scrollwork (for a fancier look)
- ● Post hole digger (if soil is tough)
Step-by-Step instructions for building a climbing rose trellis
Here’s how I build a sturdy, long-lasting trellis that supports roses through seasons—no wobbly frames or flimsy designs.
🪴 Step 1: Gather Materials and Tools for a Sturdy Base
Start with 4×4 pressure-treated posts (cut to 8 feet tall) for the main supports—this size resists rot and won’t sag under a heavy rose. You’ll also need 2×4 lumber for horizontal crossbeams and ½-inch galvanized screws (or lag bolts) to secure everything. A post hole digger and level are non-negotiable for stability.
I always pre-drill screw holes to prevent wood splitting, especially near the ends of the 2×4s. Use stain or sealant on all wood before assembly to protect it from moisture and pests. If your soil is rocky, add gravel or crushed stone at the bottom of each post hole to improve drainage.
✂️ Step 2: Assemble the Frame with Proper Spacing
Drive the 4×4 posts into the ground 2 feet deep (below frost line if in a cold climate) and space them 6 feet apart for a 4-post trellis. Use a level to ensure they’re perfectly vertical—tilted posts will warp the frame over time. Connect the tops with 2×4 crossbeams, screwing them into the posts at 4-foot intervals vertically.
For a fan-style trellis (ideal for climbing roses), add angled 2×4 supports radiating outward from the center post at 45-degree angles. This creates a natural arch shape that guides vines upward and outward. Leave 12-inch gaps between each slat—this prevents vines from getting trapped and encourages airflow, which reduces disease risk.
🌿 Step 3: Add Horizontal Slats for Vine Support
Attach 1×2 or 1×3 slats horizontally across the frame, spacing them 6–8 inches apart. This gives roses plenty of handholds to climb without overcrowding. I use stainless steel screws (not regular screws—they rust and weaken the wood) and pre-drill holes to avoid splitting. For extra durability, reinforce the corners with metal corner braces.
If your trellis will face strong winds, add diagonal bracing between posts for reinforcement. You’ll know it’s secure when you can shake it gently without hearing creaks or wobbles. A well-built trellis should last 10+ years with minimal maintenance.
☀️ Step 4: Position and Secure the Trellis in the Garden
Place the trellis where it gets full sun (6+ hours daily)—climbing roses need bright light to produce abundant blooms. Dig the post holes in a slightly curved line (not perfectly straight) to mimic the natural growth habit of roses. Backfill with native soil mixed with compost to encourage root establishment.
Once the trellis is in place, water deeply to settle the soil around the posts. I like to add mulch at the base to retain moisture and suppress weeds. Avoid piling mulch against the wood, though—keep it 2 inches away to prevent rot. After planting your roses, train the canes to the trellis using soft garden ties (never wire or anything that can cut into the stems).
⏰ Step 5: Maintain and Reinforce Over Time
Check the trellis annually for loose screws, cracked wood, or leaning posts. Tighten any connections and replace damaged slats immediately—weak spots can lead to collapsed vines. In winter, wrap the trellis in burlap or frost cloth if your climate gets harsh freezes, and remove it in early spring to allow sunlight access.
Here’s the thing—roses grow 3–5 feet per year, so your trellis should expand with them. If vines outgrow the frame, add extension slats or a second trellis nearby. Prune in late winter to shape growth and remove dead wood, which keeps the trellis from getting overloaded. With this setup, your roses will thrive for decades.
Tips & tricks for building a sturdy climbing rose trellis
Between us, a few small details can make the difference between a trellis that lasts decades and one that sags or sways after just a few seasons. Here’s what I’ve learned from building trellises for my own garden—mistakes I made (and how to avoid them).
Foundation First: The 6-foot spacing between posts in Step 1 isn’t just a suggestion—it’s critical for stability. If you’re working with especially vigorous varieties (like 'New Dawn' or 'Blaze'), widen the spacing to 8 feet to prevent leaning. I’ve seen trellises collapse after just one winter because the posts were too close together. Use wooden stakes to mark the exact hole locations before digging, and always check alignment with a string line—even a slight angle will cause long-term stress on the structure.
Lumber Selection Matters: Pressure-treated lumber is a must, but not all pressure treatments are created equal. Look for ground-contact rated 4x4 posts—they’re designed to withstand moisture and rot for years. For the horizontal supports in Step 2, use kiln-dried 2x4 lumber to minimize warping over time. I’ve had trellises fail because the wood absorbed too much moisture and bowed out of shape. If you’re building an arch, pre-drill screw holes to prevent splitting when you attach the curved pieces.
Wire Tension Technique: When stretching the 12-gauge galvanized wire in Step 3, don’t just pull it tight—create a slight sag. The wire should dip about 2 inches in the middle when you let go. This flexibility allows the rose canes to bend naturally as they grow, reducing the risk of breakage. I used to overtighten the wire, and within a season, the roses would snap under their own weight. For extra durability, use stainless steel u-bolts instead of wire staples—they won’t rust and provide a cleaner finish.
Training Tips for Long-Term Health: In Step 4, the 12-inch spacing between ties is perfect, but here’s the secret: don’t tie the canes too tightly. Use soft plant ties and leave a little room for growth—about 1/4 inch of slack. Tight ties can girdle the cane and restrict its circulation. Also, rotate the ties every few weeks to prevent the cane from growing around the tie and becoming permanently attached. This keeps the rose flexible and encourages stronger growth patterns.
Pro Tips for Build A Climbing Rose Trellis
- Between us, a few small details can make the difference between a trellis that lasts decades and one that sags or sways after just a few seasons.
- Foundation First: The 6-foot spacing between posts in Step 1 isn’t just a suggestion—it’s critical for stability.
- Lumber Selection Matters: Pressure-treated lumber is a must, but not all pressure treatments are created equal.
Frequently asked questions
Got questions about building your climbing rose trellis?
Here are some of the most common ones—plus quick, practical answers to keep your project on track!
What’s the best time of year to install a climbing rose trellis?
The ideal time is early spring (before new growth starts) or late fall (after the first frost). This gives roots time to establish before extreme weather. If planting roses in containers, you can install the trellis anytime—but secure it well to prevent wind damage.
Can I use wood scraps or repurposed materials for the frame?
Pressure-treated lumber, cedar, or even sturdy branches (like willow or hazel) work great. Just ensure the wood is rot-resistant and treated to last. Avoid untreated wood buried in the ground—it won’t hold up. For a rustic look, combine materials (e.g., metal posts + wooden slats).
How do I keep my climbing rose from growing into the trellis instead of along it?
Use soft ties (like Velcro strips or fabric strips) to gently guide canes upward—never wire or twist them, as this can damage the stems. Prune aggressively in late winter to encourage outward growth. For stubborn roses, weave canes through the trellis instead of tying them.
Will a DIY trellis survive heavy snow or wind?
Yes—but only if built sturdy enough! Bury posts at least 2 feet deep or anchor them with concrete. For snowy areas, angle the trellis slightly (like an "A" frame) to shed snow. Add cross-bracing for extra wind resistance. Lightweight trellises (like bamboo) may need winter support.
What if my roses aren’t climbing—just sprawling? How do I fix it?
Check these fixes:
- Prune back overgrown canes to encourage new, upward growth.
- Train young canes along the trellis with soft ties.
- Fertilize lightly with rose-specific food to boost vigor.
- Thin dense foliage to improve airflow (prevents disease).
Wrapping up and next steps
Building a climbing rose trellis is a rewarding project that combines creativity with practicality—giving your roses the support they need to thrive while adding charm to your garden. 🌸 With the right materials and a little patience, you’ll create a sturdy frame that encourages lush, year-round blooms.
Now that you’ve got the know-how, roll up your sleeves and start building! Once your trellis is up, the next step? Plant those roses and watch your garden transform into a fragrant, picturesque haven. Happy gardening!