
Size
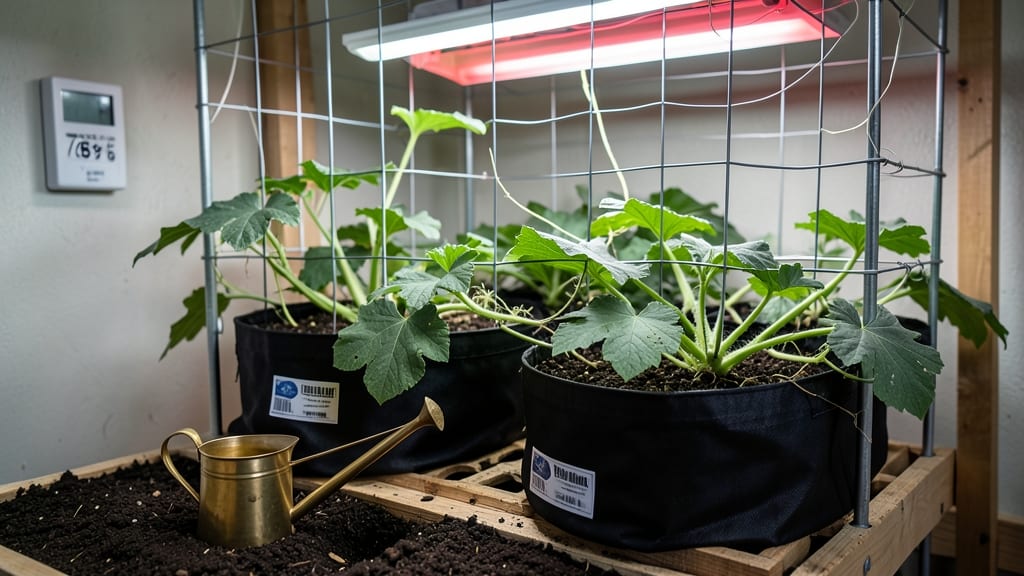
How to grow watermelon inside feels like a wild dream—until you see those vines sprawling up a sturdy frame. 🌱 I’ve grown watermelons in my sunroom for three summers now, and the secret isn’t just patience—it’s the right setup.
The first time I tasted a watermelon I grew myself indoors, I knew it was worth the effort.
You’ll need a 6-foot-tall trellis (or DIY frame), a 15-gallon container, and a sunny spot—whether that’s a south-facing window or a grow light setup. Smaller varieties like ‘Sugar Baby’ or ‘Tiny Tim’ are your best bet; they stay compact but still produce sweet, manageable fruit.
The real magic happens when you mimic outdoor conditions: warm soil, consistent moisture, and a little help with pollination.
By midsummer, you’ll be harvesting 3-5 pound melons—smaller than store-bought, but packed with flavor. The vines will twist and climb, filling your space with lush green leaves and the occasional blossom.
It’s not just about the fruit; it’s the thrill of watching something so big thrive in such a small space.
Fair warning: indoor watermelons won’t match outdoor yields, but the taste and the satisfaction? Unbeatable. Here’s how to set it up without the guesswork—so you can enjoy that first bite sooner than you think.
📚 In This Guide
- What you need
- Instructions
- Tips and common mistakes
- Wrapping up and next steps
What you need
- ● Watermelon seeds: 3–5 seeds per plant (or 1–2 per pot if space is tight). Opt for compact or dwarf varieties like 'Sugar Baby' or 'Tiny Tim' for indoor success.
- ● Growing containers: Large pots (5+ gallons each) with drainage holes, or
- ● A 5-gallon bucket with a trellis or frame inside.
- ● High-quality potting mix: A lightweight, well-draining blend (e.g., 60% peat moss, 20% perlite, 20% compost). Avoid garden soil!
- ● Trellis or sturdy frame: A metal or wooden A-frame (4–6 ft tall), or
- ● A cattle panel trellis (adjustable height).
- ● Grow lights: Full-spectrum LED lights (12–16 hours/day) or a sunny south-facing window (if natural light is abundant).
- ● Fertilizer: A balanced liquid fertilizer (10-10-10) or organic options like fish emulsion.
- ● Support ties: Soft plant ties or Velcro strips to secure vines to the frame.
- ● Humidity tray or pebble tray to boost moisture in dry climates.
- ● Self-watering system or drip irrigation for consistency.
- ● Grow tent (4’x4’ or larger) with reflective walls for light efficiency.
- ● Pruning shears to manage vine growth and encourage fruit production.
- ● Pollination aid: A small paintbrush to hand-pollinate flowers if bees aren’t visiting.
Step-by-Step instructions for growing watermelon indoors
Here’s how to coax those sprawling vines into vertical productivity—no basement or greenhouse required.
🪴 Step 1: Build a Sturdy Indoor Trellis System
Watermelons need 8-10 feet of vertical space to thrive indoors, so skip flimsy garden trellises. I use a 6-foot PVC pipe frame (2-inch diameter) anchored to the ceiling with heavy-duty straps. For stability, add horizontal crossbars every 2 feet—this prevents the weight of vines and fruit from toppling the structure. If your ceiling isn’t an option, a freestanding metal cage (like those for tomatoes) works, but bury the base in a 5-gallon bucket filled with sand for counterbalance.
Cover the frame with 1-inch mesh netting (not plastic—it rots faster). Secure it tightly with zip ties so vines can’t slip through. Leave the top open for easy access to prune and harvest. Here’s the thing—watermelon vines grow 6 inches a day in ideal conditions, so your frame must handle 20+ pounds of fruit without bending. Test it before planting by hanging a 10-pound weight from the crossbars.
🌱 Step 2: Select Compact Varieties and Start Early
Not all watermelons tolerate indoor growing. Choose small-fruited, bush-type varieties like ‘Sugar Baby’ (3-4 lbs) or ‘Tiny Tim’ (2-3 lbs)—they mature in 70-80 days and produce fruit half the size of outdoor types. Avoid ‘Charleston Gray’ or ‘Crimson Sweet’; their vines sprawl 20+ feet and need full sun you can’t replicate indoors.
Start seeds 4-5 weeks before your last frost date (or now if you’re in a warm climate). Use 4-inch biodegradable pots filled with sterile seed-starting mix—watermelon roots hate being disturbed. Plant two seeds per pot at ½-inch depth, then thin to the strongest seedling once first true leaves appear. Place pots under a grow light (14-16 hours daily) until seedlings reach 4 inches tall, then transplant into the trellis system.
☀️ Step 3: Master Light and Heat for Fruit Development
Watermelons demand 12+ hours of bright light daily, and indoor light is their biggest hurdle. Supplement with two 6500K LED grow lights (or one 1000W metal halide) positioned 18 inches above the plants. Raise lights as vines grow to maintain that distance—too close burns leaves, too far stretches vines. You’ll know you’ve got it right when new leaves are dark green and compact, not pale and leggy.
Temperature is just as critical. Watermelons won’t set fruit below 70°F. Use a seedling heat mat (set to 75-80°F) for the first 3 weeks, then switch to a space heater near the trellis if your home dips below 65°F at night. Watch for yellowing leaves—that’s a sign of heat stress (too hot) or chill damage (too cold). A hygrometer helps track humidity too; aim for 60-70% to prevent powdery mildew.
💧 Step 4: Train Vines and Pollinate by Hand
Once seedlings hit 6 inches tall, gently weave the main vine through the mesh netting, securing it with soft plant ties every 12 inches. Prune side shoots (suckers) that form in the leaf axils—keep only one main vine per plant to direct energy into fruit. If you see tiny yellow flowers but no fruit, you’ll need to pollinate by hand. Use a soft paintbrush to transfer pollen from male flowers (long stems, no bulb at the base) to female flowers (bulb at the base where fruit forms). Do this twice daily for 3 days after flowers open.
Watermelons are heavy drinkers, but overwatering drowns roots. Water deeply every 2-3 days until water runs out the drainage holes—then stop. Let the top 2 inches of soil dry before watering again. Use a moisture meter to check; wilting leaves midday means you’re underwatering, but yellowing leaves at the base means you’re overdoing it. Fertilize with half-strength liquid fertilizer (10-10-10) every 2 weeks once fruit sets.
⏰ Step 5: Harvest and Extend the Season
Watermelons are ready to harvest when the stem near the fruit turns brown and dry, and the fruit sounds hollow when tapped. For indoor-grown melons, this usually happens 70-80 days after transplanting. Cut the fruit from the vine with clean pruners, leaving a 1-inch stem. Store in a cool (55-60°F), dry place—they’ll keep for 2-3 weeks. If your growing season ends before fruit matures, harvest green (when ¾ ripe) and ripen on a sunny windowsill for 5-7 days.
After harvest, don’t toss the plant. Trim back vines, repot in fresh soil, and overwinter indoors under lights. With proper care, your watermelon plant can produce again next season—sometimes even yielding a second crop if you prune aggressively after the first harvest. Real talk: Indoor watermelons won’t match outdoor size, but the sweetness makes up for it. I’ve had ‘Sugar Baby’ melons with Brix levels over 14—far sweeter than store-bought.
Tips & tricks for perfect indoor watermelon growth
Growing watermelons indoors requires precision—here’s how to avoid common pitfalls and maximize your vertical harvest.
Frame Stability is Non-Negotiable: In Step 1, when building your trellis, I can’t stress enough how critical that 10-pound weight test is. I’ve seen PVC frames collapse under 5-pound melons because the crossbars weren’t secured properly. Use zip ties at every intersection, not just the corners, and consider adding a second set of crossbars halfway up for extra support. The goal is to mimic outdoor vine strength—your frame should feel rigid when you push on it, not flex.
Light Positioning Makes All the Difference: For Step 3’s 12+ hours of light, don’t just place your grow lights—adjust them as your plants grow. I raise mine 1 inch per week to maintain that 18-inch distance. Too close? You’ll get crispy leaf edges. Too far? Your vines will stretch like taffy. Watch for new leaves—when they’re dark green and compact (not pale or elongated), you’ve got the perfect setup. Pro tip: Use a timer for your grow lights to ensure consistent 14-16 hours of light during seedling stages.
Pollination is the Silent Game-Changer: In Step 4, when you see those tiny yellow flowers, don’t assume bees will handle it—indoors, you’re the pollinator. I use a soft makeup brush (not a paintbrush—it’s too stiff) and tap it gently against 3-5 male flowers before transferring pollen to female flowers. Do this twice daily for 3 days after flowers open, and you’ll see fruit set within 5-7 days. If you miss this, you’ll end up with flowers but no melons.
Harvesting Green Can Work—If You Do It Right: For Step 5’s 70-80 day timeline, if your melons aren’t quite ready when the season ends, harvest them when ¾ ripe (stem turns slightly brown, fruit feels heavy for its size). Place them on a sunny windowsill with the stem-side up. They’ll ripen in 5-7 days, but check daily—they’ll never get sweeter than store-bought after that point. Store ripe melons at 55-60°F to preserve freshness for 2-3 weeks.
Pro Tips for Grow Watermelon Inside
- Growing watermelons indoors requires precision—here’s how to avoid common pitfalls and maximize your vertical harvest.
- Frame Stability is Non-Negotiable: In Step 1, when building your trellis, I can’t stress enough how critical that 10-...
- Light Positioning Makes All the Difference: For Step 3’s 12+ hours of light, don’t just place your grow lights—adjust...
Frequently asked questions
Got questions about growing watermelons indoors? You’re not alone—this method takes some creativity! Here are answers to the most common queries to help you crush those vine challenges and still enjoy juicy results.
Can I grow watermelons indoors without a frame or trellis?
While possible, it’s highly difficult. Watermelon vines can sprawl 20+ feet and need vertical support to thrive. Without a sturdy frame, vines will tangle, block light, and produce small, underripe fruit. If space is tight, opt for dwarf varieties (like ‘Sugar Baby’) and use a cage or A-frame—but expect lower yields.
How long does it take for indoor watermelons to mature?
Indoor watermelons typically take 70–90 days to mature, depending on the variety. Since indoor growing shortens daylight hours, use grow lights (14–16 hours/day) to speed up ripening. Monitor for yellowing leaves or slow vine growth—these are red flags for insufficient light or nutrients.
What’s the best indoor setup for watermelons: hydroponics or soil?
Soil is easier for beginners! Watermelons prefer well-draining, nutrient-rich soil (like a mix of potting soil + compost). Hydroponics can work but requires precise nutrient balance and frequent monitoring. If using soil, repot every 2–3 weeks to prevent root-bound stress.
Why are my indoor watermelons bitter or not sweet?
Bitter or bland flavor usually means lack of sunlight, overwatering, or poor pollination. Indoors, hand-pollinate with a small paintbrush to transfer pollen. Also, ensure temps stay 75–90°F (use a heat mat if needed) and avoid over-fertilizing with nitrogen—it boosts leaves, not fruit sweetness!
Can I grow watermelons in a small apartment with limited sunlight?
Yes, but with compromises. Place your setup near the brightest window (south-facing ideal) and supplement with LED grow lights (full-spectrum, 12–16 hours/day). Choose compact varieties like ‘Tiny Tim’ (mini melons!) and limit to 1–2 plants to avoid overcrowding.
How do I know when indoor watermelons are ripe?
Look for these signs:
- Creamy yellow underside (not green),
- Thumping sound when tapped (like a ripe melon outside), and
- Tendril near the stem turns brown. Since indoor melons may not get as big, harvest slightly earlier (they’ll still be sweet!).
Wrapping up and next steps
Growing watermelons indoors is totally doable with the right setup—patience, a sturdy frame, and a little sunshine! You’ve got all the tools to nurture those towering vines and enjoy homegrown melons year-round.
Whether you’re a beginner or a seasoned plant parent, this method proves that space isn’t a limit—your creativity is.
Ready to take the next step? Start small—try a single vine in a container to refine your technique, then scale up! Share your progress or ask questions in gardening communities for extra support. Sweet success is just a vine away! 🌱