
Propagation
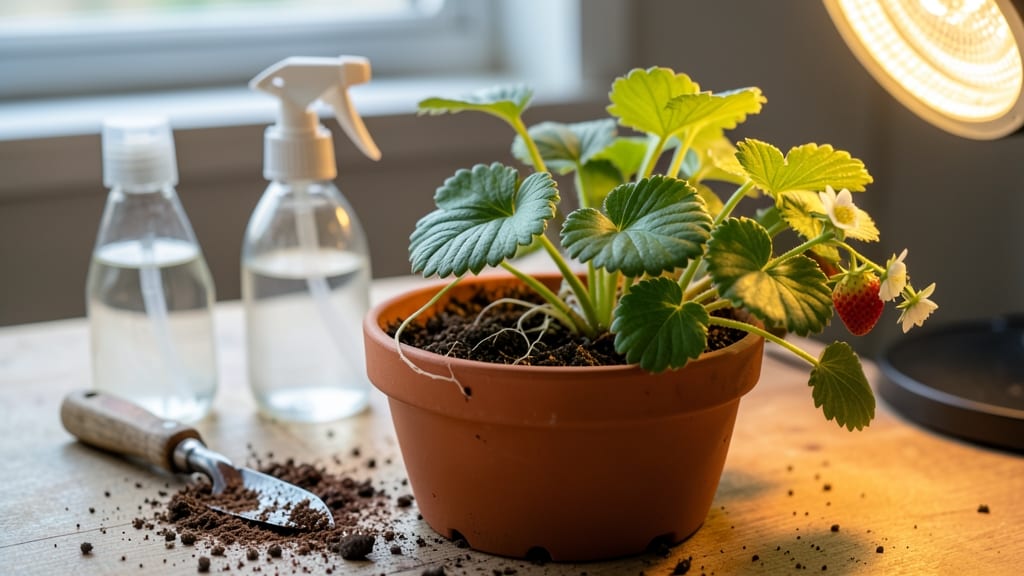
That single strawberry from your grocery bag could turn into a year-round harvest—how to grow strawberries from a strawberry indoors is simpler than you think. 🌱 I’ve grown strawberries indoors from store-bought berries three winters in a row—no greenhouse, no yard, just a sunny windowsill and a little patience.
The key? Picking the right variety and mimicking the conditions strawberries crave, even in an apartment. You’ll need just three supplies: a small pot with drainage, lightweight potting mix, and a bright spot (natural light or a grow bulb).
Ever-bearing varieties like ‘Albion’ or ‘Seascape’ produce fruit indoors, while June-bearing types like ‘Chandler’ take longer but reward you with bigger berries. Skip the garden soil—it’s too heavy, and strawberries hate soggy roots.
By week 8, you’ll see tiny white flowers budding, and within 10-12 weeks, those first berries will ripen—sweeter than store-bought, with no travel scars. The trick is keeping humidity up (pebble trays help) and pinching off early flowers to build a stronger plant.
No green thumb needed—just consistency. This works in kitchens, bathrooms, or even under desk lamps. The only rule? Don’t rush it. Indoor strawberries take time, but the first bite of homegrown fruit in February makes every wait worthwhile.
📚 In This Guide
- What you need
- Instructions
- Tips and common mistakes
- Wrapping up and next steps
What you need
- ● Strawberry plant: A ripe, organic strawberry (preferably with a green leafy top) OR a strawberry runner with roots
- ● If using a store-bought berry, choose one with fresh, firm fruit and a green calyx (leafy top).
- ● Containers: 2–4 small pots (4–6 inches wide) with drainage holes OR a long shallow tray (10+ inches) for multiple plants
- ● 1–2 nursery pots (6–8 inches wide) for transplanting (after roots establish).
- ● Growing medium: 1 bag (1–2 cubic feet) of high-quality potting mix (look for well-draining, peat-free, or coconut coir-based options)
- ○ Perlite or vermiculite (1 cup) (for aeration—optional but recommended)
- ● Watering tools: A spray bottle (8–16 oz) OR a small watering can with a fine rose
- ○ 1–2 ice cube trays (for bottom-watering method—optional but handy)
- ● Lighting: A grow light (LED or fluorescent, 12–16 inches above plants) OR a south-facing window (6+ hours of sunlight daily).
- ● Fertilizer: Balanced liquid fertilizer (5-5-5 or 10-10-10 dilution) OR slow-release granular fertilizer (follow package instructions).
- ● Humidity dome or plastic wrap (to retain moisture during germination).
- ● Hydrogen peroxide (3%) (1 tsp per cup of water to prevent rot when rooting).
- ○ Small fan (optional) (for gentle airflow to strengthen stems).
- ● Plant labels & marker (to track varieties if growing multiple types).
- ● Peat moss or coconut coir pellets (for extra moisture retention in trays).
Step-by-step instructions for growing strawberries indoors
Here’s how to turn a single strawberry into a thriving indoor plant that keeps producing fruit year-round.
🌱 Step 1: Choose and Prepare Your Strawberry
Start with a firm, fresh strawberry that still has its green cap attached—this is where the plant’s roots will emerge. Remove any leaves or stems from the top half of the fruit, leaving just the cap and the bottom portion with seeds. I like to rinse it gently under cool water to remove any debris, then pat it dry with a paper towel.
Place the prepared strawberry in a small container (like a shallow dish or even a paper towel-lined plate) with the cap-side down. The seeds on the bottom will eventually sprout roots. Keep it in a warm spot—around 70°F—where it gets bright, indirect light (like a sunny windowsill without direct midday sun).
💧 Step 2: Encourage Root Growth and Transplant
Check the strawberry daily and mist it lightly with water—just enough to keep the bottom moist but not soggy. Within 7-14 days, you’ll see tiny white roots sprouting from the seeds. This is the moment you’ve been waiting for! Once the roots reach about 1 inch long, it’s time to transplant.
Fill a 4-inch pot (one of your four servings) with well-draining potting mix—I mix equal parts of the potting soil and perlite to prevent root rot. Gently place the strawberry root-side down into the soil, pressing lightly to secure it. Water it thoroughly until water drains from the bottom, then place it back in bright, indirect light.
☀️ Step 3: Provide Ideal Light and Care
Strawberries need 6-8 hours of light daily to thrive, so if your windowsill isn’t bright enough, supplement with a grow light placed 6 inches above the plant. You’ll know it’s getting enough light when the leaves stay a vibrant green and the plant grows upright instead of stretching toward the light.
Water the plant when the top inch of soil feels dry—about once a week—but avoid letting it sit in water. I use a spray bottle for the first few weeks to keep the soil evenly moist without overwatering. Once the plant establishes itself (after 4-6 weeks), you can water from the bottom of the pot to encourage stronger roots.
🌿 Step 4: Support Growth and Harvest Fruit
As your strawberry plant grows, it’ll produce long runners (stems) with baby plants at the tips. You can either pinch these off to encourage the mother plant to focus on fruit production or plant them in separate pots to expand your harvest. I usually do both—keeping a few runners to propagate new plants while letting others fruit.
When the plant flowers, you’ll know it’s ready to produce fruit. After the flowers fade, tiny strawberries will begin to form. Harvest them when they’re fully red and slightly soft to the touch—usually within 2-3 weeks of flowering. Enjoy your homegrown berries, and don’t be surprised if the plant keeps producing fruit for months!
Tips & tricks for growing indoor strawberries
Real talk: Turning a store-bought strawberry into a thriving plant takes patience, but these tricks make all the difference between success and frustration.
Root Growth Secret: The key to fast root development is maintaining that delicate balance of moisture. I learned this the hard way after ruining three batches—too much water causes rot, while too little stunts growth. After placing your strawberry in the container, use a spray bottle to mist the bottom just enough to keep it damp (not wet) during those critical first 7-14 days. A humidity dome made from plastic wrap over the container can also help create the perfect microclimate for root formation.
Transplant Timing: Don't rush the transplant! Wait until those roots reach about 1 inch long—this ensures your little plant has enough strength to establish itself in its new 4-inch pot. I've found that using a clear container for the rooting stage lets you monitor progress without disturbing the plant. Once transplanted, press the soil gently around the roots to eliminate air pockets, which can cause stress during this transition phase.
Lighting Strategy: Natural light is ideal, but if your windowsill isn't bright enough, a simple LED grow light placed 6 inches above the plant will work wonders. I recommend using a timer for your grow light to maintain those essential 6-8 hours of daily light—this consistency is what prevents those leggy, weak plants. Rotate your plant quarter-turns daily so all sides get even exposure, which helps prevent the plant from growing toward one light source.
Harvesting Hack: Those tiny strawberries might look underwhelming at first, but they're packed with flavor! The secret to continuous harvests is strategic pruning. Once your plant starts producing runners (those long stems with baby plants), you have two options: either pinch them off to redirect energy to fruit production, or propagate them into new plants. I've found that keeping 2-3 runners for propagation while removing the rest gives me the best balance of fruit and expansion.
Pro Tips for Grow Strawberries From A Strawberry Indoors
- Real talk: Turning a store-bought strawberry into a thriving plant takes patience, but these tricks make all the diff...
- Root Growth Secret: The key to fast root development is maintaining that delicate balance of moisture. I learned this...
- Transplant Timing: Don't rush the transplant! Wait until those roots reach about 1 inch long—this ensures your little...
Frequently asked questions
Got questions about growing strawberries indoors? You’re not alone! Here are answers to the most common curiosities—so you can enjoy homegrown berries without the guesswork.
Can I grow strawberries indoors year-round?
With the right setup—adequate light (grow lights or a sunny windowsill), temperature control (60–75°F), and humidity—you can grow strawberries indoors anytime. Just be patient: indoor plants may take longer to fruit than outdoor ones, but they’ll reward you with berries in 3–6 months.
How do I know if my strawberry plant is healthy?
Healthy strawberry plants have vibrant green leaves, no yellowing or spots, and firm, plump runners. Watch for pests like aphids or signs of overwatering (mushy leaves) or underwatering (crispy edges). Prune dead leaves and use neem oil if pests appear—your plant will thank you with bigger, sweeter berries!
Why isn’t my strawberry plant fruiting?
Indoor strawberries need 12–14 hours of light daily to flower and fruit. If your plant isn’t producing berries, check:
- Light: Supplement with a grow light if natural light is weak.
- Temperature: Keep it consistent (avoid drafts or heaters).
- Age: Some varieties (like Alpine strawberries) fruit faster than June-bearing types.
- Patience: First-year plants focus on growth—berries may appear in the second year.
What’s the best indoor setup for strawberries?
Start with a 6–12-inch pot (or hanging basket for trailing varieties) with well-draining soil. Place near a south-facing window or under a full-spectrum LED grow light. For humidity, try a pebble tray with water or a humidifier—strawberries love moisture but hate soggy roots!
Can I reuse soil from last year’s strawberry plant?
Not recommended! Old soil may harbor diseases or pests (like fungal infections). Refresh with a sterile potting mix (add perlite or coconut coir for drainage). If you’re really short on supplies, bake the soil at 200°F for 30 minutes to sterilize it—but new soil is always best.
Wrapping up and next steps
Growing strawberries indoors from a single fruit is a rewarding journey that brings fresh, sweet berries to your table anytime—no outdoor space required! With the right setup, patience, and care, you’ll enjoy the thrill of nurturing tiny plants into thriving vines. 🌱✨
Now that you’re armed with all the tips, why not share your progress? Snap a photo of your first sprouts or ripe berries and tag us—we’d love to cheer you on! For even more indoor gardening adventures, try your hand at growing herbs or microgreens next. Happy growing!