
How To
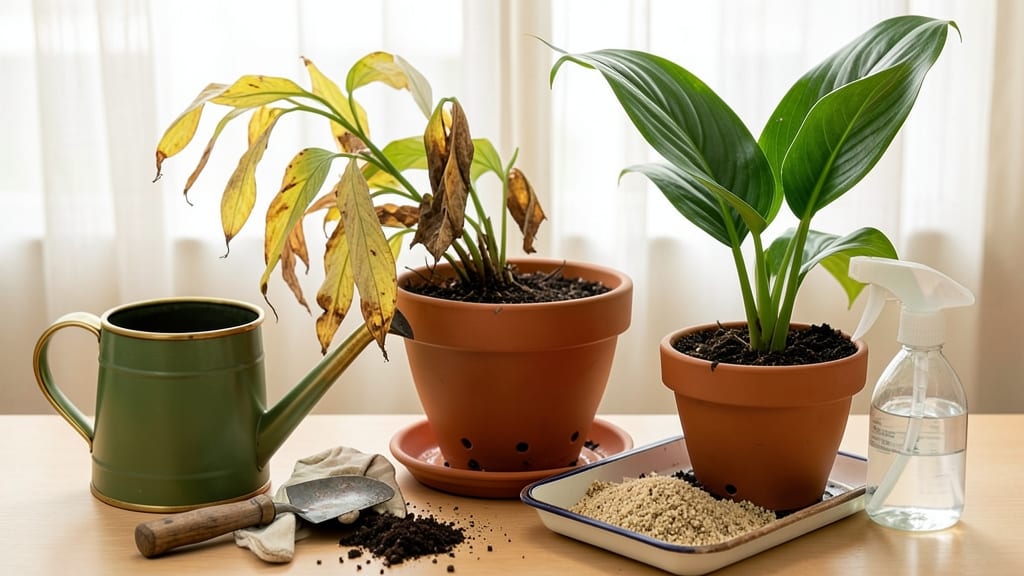
How to fix an overwatered peace lily—your drooping leaves and mushy stems don’t mean goodbye, just a 3-step rescue. 💚 I've nursed back more soggy roots than I'd like to admit, and the key is acting fast before root rot takes over. The good news? Peace lilies are tough survivors when you give them the right conditions.
Start by checking the roots: healthy ones are firm and white, while black or slimy roots are a red flag. Gently remove the plant from its pot, trim the bad roots with clean scissors, and repot in fresh, well-draining soil.
This isn't just about saving the plant—it's about giving it a fresh start with proper airflow and drainage.
Within 2-4 weeks, you'll see new growth pushing through, and those once-wilted leaves will perk back up. The secret is cutting back on water—only when the top inch of soil feels dry. A moisture meter or your finger works perfectly fine (yes, I check mine daily now).
For long-term success, choose a pot with drainage holes and a soil mix designed for tropical plants. A little less water goes a long way—your peace lily will thank you with glossy leaves and those signature white blooms.
The first sign of recovery? Bright green leaves reaching for the light again.
📚 In This Guide
- What you need
- Instructions
- Tips and common mistakes
- Wrapping up and next steps
What you need
- ● Well-draining potting mix: A blend of peat moss, perlite, and orchid bark (or a pre-made mix labeled for peace lilies). Quantity: Enough to fill your pot (typically 1-2 bags, depending on pot size).
- ● Clean, sharp pruning shears or scissors: Sterilized with rubbing alcohol to prevent infection. Specs: Small, precise blades for trimming roots and leaves.
- ● Gloved hands: Disposable or washable gloves to protect against soil bacteria and sharp edges.
- ○ Spray bottle with water: For gentle misting (use room-temperature water). Optional: Add a few drops of hydrogen peroxide (3%) to deter fungal growth.
- ● New pot (if needed): Only if your current pot lacks drainage holes. Choose one 1-2 inches larger than the current pot with drainage holes.
- ● Drainage tray or saucer: To catch excess water and prevent soggy roots.
- ○ Rooting hormone (optional but helpful): A powder or gel to encourage healthy root regrowth. Brand suggestion: Dyna-Gro or similar.
- ● Fungicide: A mild solution like neem oil spray to treat potential root rot or fungal issues.
- ● Moisture meter: To check soil moisture levels accurately (especially if you’re unsure about watering habits).
- ● Humidity tray: A shallow tray with pebbles and water to create a humid microclimate for recovery.
- ● Plant support (e.g., stakes or moss pole): If your peace lily’s stems are weak from overwatering.
Step-by-Step instructions for reviving an overwatered peace lily
Here’s how to nurse your peace lily back to health—even if the roots are struggling.
🌱 Step 1: Remove the Plant and Assess the Roots
Gently slide the peace lily out of its pot, shaking off excess soil to reveal the roots. You’re looking for two signs: mushy, black roots (a sign of rot) and firm, white or light tan roots (healthy ones). If more than half the roots look mushy, don’t panic—this step is still salvageable. Use clean, sharp scissors to trim away any blackened or squishy roots, cutting back to the healthy tissue.
Real talk: You might not save every root, but the plant can regrow from the healthy ones. Place the plant aside for now—we’ll address the soil next. If the roots smell foul, that’s another sign of rot, and you’ll need to act fast to prevent it from spreading to the remaining healthy roots.
💧 Step 2: Refresh the Soil and Repot
Empty the old soil into a trash bag—it’s likely waterlogged and may still harbor harmful fungi. Fill a clean pot (one with drainage holes) with fresh, well-draining potting mix designed for peace lilies or general houseplants. Mix in a handful of perlite or orchid bark to improve aeration and prevent future waterlogging. The pot should be just slightly larger than the root ball—peace lilies thrive in snug spaces.
Tap the pot gently to settle the soil, then place the plant in the center. Fill around the roots with the new mix, pressing lightly to eliminate air pockets. Don’t pack it down too firmly—you want the soil to stay loose so excess water drains away quickly. Water lightly only if the soil feels bone-dry to the touch after repotting.
☀️ Step 3: Adjust Watering and Light Conditions
Peace lilies are resilient, but they need a break from overwatering. Wait 3-5 days before watering again, even if the soil looks dry. Stick your finger 1 inch deep into the soil—if it feels damp, wait another day. Once you water, do so thoroughly but only when the top 2 inches of soil are completely dry. This prevents the roots from sitting in moisture and encourages them to seek out water deeper in the pot.
Move the plant to a spot with bright, indirect light—no direct sun, which can stress a recovering plant. If your home is dim, a grow light on a timer for 12-14 hours daily can help. You’ll notice new growth within 2-4 weeks if the roots are healing, but be patient. Drooping leaves may take longer to perk up as the roots rebuild.
✂️ Step 4: Prune Damaged Foliage and Monitor Progress
Use clean scissors to trim any yellow or brown leaves back to the base. This might seem drastic, but it redirects the plant’s energy toward root and new leaf growth. Avoid cutting healthy green leaves—even if they’re drooping, they’re still photosynthesizing and helping the plant recover. Wipe the scissors with rubbing alcohol between cuts to prevent spreading disease.
Keep an eye on the soil moisture and leaf condition. If new leaves emerge within 4-6 weeks, your peace lily is on the mend. If the leaves continue to yellow or the stems soften, the roots may still be struggling—repeat Step 1 and trim back any remaining rot. A healthy peace lily will eventually bounce back, but consistency in care is key.
⏰ Step 5: Reestablish a Healthy Routine
Once your peace lily shows signs of recovery—like firm stems and new growth—gradually return to a normal watering schedule. Water when the top 2 inches of soil are dry, and always use a pot with drainage holes. Avoid letting the plant sit in saucers of water, as this can undo your progress. Mist the leaves occasionally to boost humidity, but avoid soggy soil.
Here’s the thing—peace lilies are forgiving, but they hate being kept too wet. From now on, stick your finger in the soil before watering. If it’s damp, wait. If it’s dry, water thoroughly and let excess drain away completely. With patience, your peace lily will thrive again—and you’ll spot the signs of overwatering sooner next time.
Tips & tricks for reviving an overwatered peace lily
Here's what nobody tells you about bringing your peace lily back from the brink—these tricks have saved countless plants for our team.
Root Trimming Technique: When you're cutting back those mushy roots in Step 1, look for the transition point where healthy white tissue meets the brown rot. This is your guide—cut just beyond that line, and you'll give your plant the clean slate it needs. I've seen people hesitate to trim aggressively, but remember: it's better to remove too much than too little. Healthy roots will regenerate quickly once the rot is gone.
Soil Mix Matters: In Step 2, don't just grab any potting mix. Look for blends specifically formulated for tropical plants or those labeled "well-draining." I've had the most success with mixes containing 50% peat moss or coconut coir and 50% perlite or orchid bark. This ratio creates the air pockets roots need to breathe after their waterlogged ordeal. If you're making your own mix, add a handful of activated charcoal to prevent bacterial growth during recovery.
Watering Confidence: That 3-5 day waiting period in Step 3 can feel agonizing, but resist the urge to check the soil daily. Overwatering is what got your plant into trouble in the first place. Instead, use the finger test: stick your finger 1-2 inches deep—if it comes out clean and dry, it's time to water. The first watering should be thorough, but subsequent waterings should wait until that topsoil feels completely dry to the touch. This discipline is what keeps peace lilies thriving long-term.
Light Positioning: For Step 3's bright indirect light requirement, think about your home's natural light patterns. East-facing windows provide gentle morning light without harsh afternoon sun, while north-facing windows offer consistent light without heat. If you only have south or west-facing windows, use a sheer curtain to diffuse the intensity. I've seen peace lilies recover beautifully under grow lights set to 12 hours of light per day—just keep them 6-12 inches away from the bulb.
Pro Tips for Fix Overwatered Peace Lily
- Here's what nobody tells you about bringing your peace lily back from the brink—these tricks have saved countless pla...
- Root Trimming Technique: When you're cutting back those mushy roots in Step 1, look for the transition point where he...
- Soil Mix Matters: In Step 2, don't just grab any potting mix. Look for blends specifically formulated for tropical pl...
Frequently asked questions
about fixing an overwatered peace lily—because even plant parents need a little extra help! Here are answers to the most common concerns to get your Spathiphyllum back on track.How quickly can I save an overwatered peace lily?
With immediate action (like repotting and adjusting watering), you may see improvement in 1-2 weeks. Roots can recover faster if the soil isn’t waterlogged for more than 3-5 days. Patience is key—don’t rush the process!
Can I use hydrogen peroxide to fix root rot?
Yes! Mix 1 tsp of 3% hydrogen peroxide per quart of water and soak the roots for 10 minutes to disinfect and promote healing. Avoid overdoing it—once a week is plenty. Pair this with proper drainage to prevent recurrence.
What’s the best way to check if my peace lily is still overwatered?
Stick your finger 1-2 inches into the soil. If it’s soggy or smells foul, you’re still overwatering. Also, check the leaves: yellowing, drooping, or mushy stems are red flags. Healthy soil should feel slightly damp but not wet.
Should I trim yellow leaves or wait for them to dry out?
Trim them immediately—yellow leaves are a sign of stress and can drain energy from the plant. Use clean scissors to cut at the base, and avoid pulling. This helps the peace lily focus on reviving its roots instead of maintaining dead foliage.
Will my peace lily survive if the roots are mushy and black?
It depends! If some healthy roots remain, prune the black/mushy ones, repot, and adjust care. If all roots are rotten, the plant may not recover. Start fresh with a cutting if needed—peace lilies are resilient but need a fighting chance!
How often should I water after fixing overwatering?
Wait until the top 1-2 inches of soil are dry (usually every 1-2 weeks, depending on humidity and light). Use the “thumb test” to avoid guesswork. Over time, you’ll learn your plant’s rhythm!
Wrapping up and next steps
Fixing an overwatered peace lily is totally doable—your plant just needs a little TLC and patience! 🌱 By adjusting watering habits, repotting if needed, and giving it time to recover, you’ll help it bounce back stronger. Remember: yellow leaves and soggy soil are red flags, but they’re not a death sentence.
Ready to give your peace lily the fresh start it deserves? Start with one small step today—check the soil moisture next time you water! Your green thumb is growing stronger with every effort.