
Pruning
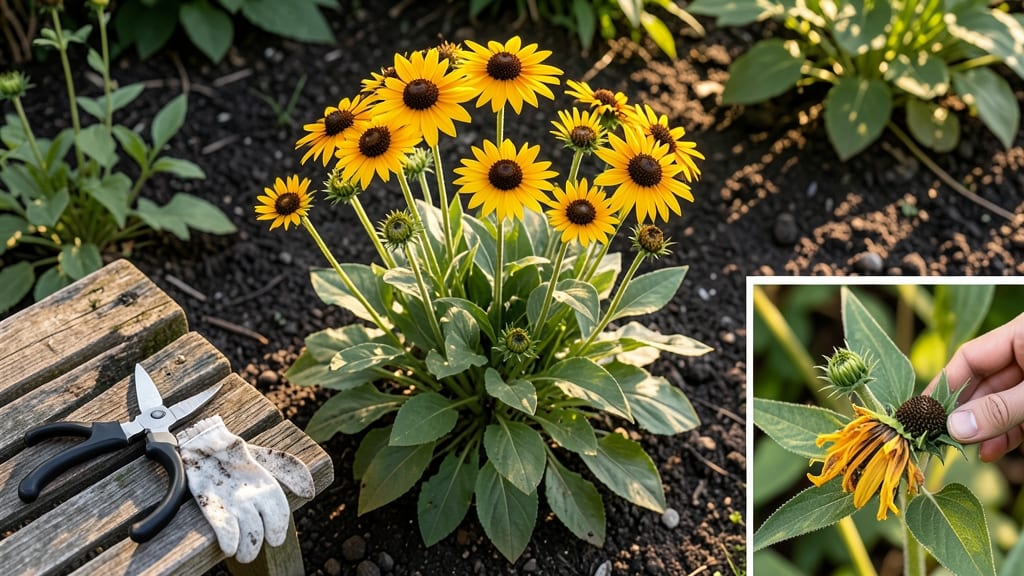
Deadheading rudbeckia turns one spent bloom into a bush full of fresh ones. ✂️ I’ve watched my black-eyed Susans go from a single flower to a thriving cluster just by snipping at the right time—no fancy tools or horticulture degree required.
The secret lies in timing and technique: grab blooms when they’re past their prime (petals drooping, center turning brown) and cut just above the next set of leaves.
This simple step tricks the plant into focusing its energy on new growth instead of seed production, and you’ll see fresh blooms in 2-3 weeks. You’ll end up with rudbeckia that flowers well into fall, outlasting most perennials.
The plants stay compact, the colors stay vibrant, and you’ll have cut flowers lasting longer too. Plus, it’s a great way to keep your garden looking full and lively without constant replanting. Fair warning: don’t overdo it—if you cut too aggressively, you might remove next year’s buds.
And always use clean, sharp tools to avoid spreading disease. Now grab those shears and let’s get to work!
📚 In This Guide
- What you need
- Instructions
- Tips and common mistakes
- Wrapping up and next steps
What you need
- ● Pruning shears or sharp scissors: Opt for clean, bypass-style pruners (avoid anvil types—they crush stems). A 5-inch pair works best for most Rudbeckia varieties.
- ○ Gloves (optional but recommended): Lightweight gardening gloves protect hands from thorns (especially in Rudbeckia hirta) and dirt.
- ● Disinfectant (70% isopropyl alcohol or bleach solution): Wipe tools between cuts to prevent disease spread. Mix 1 part bleach to 9 parts water for a quick sanitizer.
- ● Trash bag or bucket: A 5-gallon capacity is ideal for collecting spent blooms and debris.
- ● Hand pruners with ergonomic grips: Reduces hand fatigue during long sessions (great for large patches!).
- ● Knee pad or stool: For comfort if you’re working with tall varieties like Rudbeckia laciniata.
- ● Compost bin: Toss deadheaded blooms here—they’ll break down into nutrient-rich soil.
- ● Spray bottle with water: Keeps tools clean and blooms dust-free while you work.
Step-by-Step instructions for deadheading rudbeckia
Keep those golden blooms coming all season with this simple, satisfying technique.
✂️ Step 1: Identify the Right Flowers to Snip
Wait until a rudbeckia bloom starts fading—when the petals flatten and the center turns brown. These are the ones ready for deadheading. I always check the center first: if it’s dry and crumbly, that’s your signal. Never cut healthy blooms; you’ll rob your plant of its energy and shorten the season.
Grab your pruners and hold the stem about ½ inch above the next set of leaves or the next bud. This encourages new growth from that spot. If you cut too close, you might damage the stem; too far away, and you’ll leave a stub that looks messy. Rudbeckia is forgiving, but precision here means cleaner stems and more flowers.
🌿 Step 2: Snip at the Correct Angle
Make your cut at a 45-degree angle just above a leaf node or bud. This angled cut helps water run off the stem instead of pooling, which prevents rot. I like to imagine slicing the stem diagonally like a pizza slice—it’s a little trick that keeps plants healthier longer.
Use clean, sharp pruners to avoid tearing the stem. Dull blades crush the plant tissue, making it harder for new blooms to form. If your pruners are rusty or bent, sterilize them with rubbing alcohol first. You’ll see the difference in how smoothly the stem separates—no jagged edges, just a clean break.
💧 Step 3: Water and Fertilize After Deadheading
Give your rudbeckia a good drink right after deadheading. The roots need moisture to support new growth, especially if you’ve just removed a big cluster of blooms. Water deeply until the soil is damp 6 inches down. You’ll know it’s enough when water runs out the drainage holes if your plant is in a pot.
Now’s the time to feed, too. A light application of balanced fertilizer (10-10-10) encourages stronger regrowth. I like to mix a handful of compost into the soil around the base—it’s like giving your plant a vitamin boost. Avoid heavy fertilizers, though; rudbeckia is low-maintenance and doesn’t need a lot to thrive.
☀️ Step 4: Monitor for New Growth
Within 7-10 days, you should see fresh buds forming at the base of where you cut. Keep an eye on the plant’s overall health—healthy rudbeckia has deep green leaves and sturdy stems. If the leaves start yellowing or wilting, it might need more water or better drainage.
Deadheading isn’t just about cutting—it’s about observing. Notice how the plant responds to your care. If you’re in a hot, dry climate, you might need to water more often. In cooler weather, growth slows down naturally. Adjust your routine based on what you see, and your rudbeckia will reward you with blooms until the first frost.
⏰ Step 5: Repeat Weekly for Continuous Blooms
Deadheading rudbeckia isn’t a one-time task—it’s an ongoing conversation with your plant. Check your garden once a week and snip any faded blooms. This keeps the plant focused on producing new flowers instead of seeding. I set a reminder on my phone so I don’t forget; consistency is key.
By mid-summer, your rudbeckia will be a nonstop showstopper. The more you deadhead, the more it blooms. And here’s the best part: those spent blooms make great cut flowers, so you can bring the golden cheer indoors too. It’s a win-win—your garden stays pretty, and you get fresh bouquets for free.
Tips & tricks for perfect rudbeckia deadheading
The secret to keeping your rudbeckia blooming all season isn't just about cutting—it's about timing, technique, and understanding your plant's signals.
Timing is Everything: I learned this the hard way after ruining three batches of blooms by cutting too early. Wait until the petals flatten and the center turns completely brown—that's your cue. The plant needs to fully mature the bloom before it can redirect energy to new growth. If you cut too soon, you're essentially telling the rudbeckia to waste its energy on an unfinished flower.
The Angle Game-Changer: That 45-degree angle in Step 2 isn't just for looks—it's a water management system. The diagonal cut creates a natural channel for water to run off the stem instead of pooling at the cut end, which prevents rot. Think of it like a roof gutter: if you cut straight across, water collects and creates a perfect breeding ground for disease. The angled cut also exposes more surface area for new buds to emerge from.
Post-Cut Care Makes All the Difference: After you've made your clean cuts, don't just walk away. The real magic happens in Step 3 when you give your plant that deep watering. I've seen rudbeckia plants revive from near-wilted states after a proper 6-inch deep watering—it's like giving them a drink of cold water after a hard workout. That balanced fertilizer (10-10-10) application is where the growth really kicks in, but here's the secret: mix in a handful of compost too. The microbes in compost actually help the plant absorb nutrients more efficiently than chemical fertilizers alone.
Pro Tips for Deadhead Rudbeckia
- The secret to keeping your rudbeckia blooming all season isn't just about cutting—it's about timing, technique, and u...
- Timing is Everything: I learned this the hard way after ruining three batches of blooms by cutting too early. Wait un...
- The Angle Game-Changer: That 45-degree angle in Step 2 isn't just for looks—it's a water management system. The diago...
Frequently asked questions
Got questions about deadheading rudbeckia? You’re not alone—this simple task can feel tricky at first! Here are answers to the most common queries to keep your black-eyed Susans thriving.
When is the best time to deadhead rudbeckia?
Deadhead rudbeckia after the blooms fade but before the seed heads form. Aim for late spring through early fall, ideally on a dry, sunny morning. This prevents self-seeding while encouraging fresh blooms. Pro tip: Check plants weekly—overlooking a few days won’t hurt, but consistency keeps them flowering longer!
Do I cut all the way to the base, or leave some stem?
Trim just above a set of healthy leaves (about ¼ inch above) to avoid exposing bare stems. This encourages new growth while keeping the plant sturdy. Avoid cutting into woody stems—focus on the green, leafy parts. For extra vigor, snip back by ⅓ if the plant looks leggy.
What if my rudbeckia keeps producing seed heads instead of blooms?
Seed heads mean your plant is prioritizing reproduction over flowers. To fix this, deadhead earlier (as soon as petals droop) and fertilize lightly with a balanced 10-10-10 mix. Overcrowding or poor soil can also trigger this—thin plants and ensure they get 6+ hours of sun daily. Bonus: Save seeds for next year if you’re okay with volunteers!
Can I deadhead rudbeckia after rain or in wet conditions?
Wait for dry weather! Wet stems or tools can spread disease (like powdery mildew) or dull your pruners. If you must work in damp conditions, sterilize shears with rubbing alcohol first. Remember: Rudbeckia handles deadheading gracefully, so a quick pause won’t harm your plants.
Are there any rudbeckia varieties that don’t need deadheading?
While all rudbeckia benefits from deadheading, some varieties (like ‘Cherokee Sunset’) are more forgiving and may rebloom with minimal effort. Dwarf types (e.g., ‘Indian Summer’) often self-clean, but they’ll still produce more flowers if you snip spent blooms. For maximum blooms, though, deadheading pays off for every variety!
Wrapping up and next steps
Deadheading Rudbeckia is your secret weapon for a garden that keeps blooming all season long! 🌸 With just a pair of clean shears and a little time, you can encourage lush, vibrant flowers while keeping your plants healthy and happy.
Think of it as a simple ritual—snip, sip, repeat—and watch your garden thrive.
Ready to put your new skills to work? Grab those shears and head outside! Next, why not explore other pruning techniques to keep your garden looking its best year-round? Happy gardening! 🌿